I have always been fascinated by photographs of
the world around us. I think that is why I got into
photography back in the late 1960s, back when film was king,
before the PC and Photoshop. Taking most photos of the stars
requires the ability to follow the motion of the sky. It
was only recently that relatively low cost hardware was
available to accomplish this task.
In the old days, film
was used for photos. Today, it is digital all the
way. I use a variety of digital cameras, but the one
currently best suited for the task is my Olympus OM-D
EM-5. This is a micro four-thirds (MFT) format camera that
has "live view" that allows focusing the camera/lens or
camera/telescope combination with ease. Autofocus, even
the best autofocus, sucks in very low light, so being able to
focus is critical. The Olympus camera is much smaller, and
much less expensive than my Canon but it has exceeded my
expectations in almost every regard.
The other digital
camera that I use is a top of the line (in 2008) 1Ds Mark
3. The Mark 3 is a 21 mp camera that is built war-zone
tough. But, that toughness has a cost (besides the
wallet-busting price) which is weight. The build quality
is top drawer, but the camera body alone is about 4
pounds. Add a 3.5 pound lens on that, now you have some
meat that you have to manage. And the weight of the
camera/lens combo is beyond the capacity of some of the low-end
equipment for tracking (like the Vixen Polarie).
Lenses are a critical
element to any photography action. Make no mistake about
it, there are OK lenses and there are excellent lenses and the
difference is cost. It is certainly true that there are
some reasonable cost lenses that are sharp and produce
acceptable photos, but that is the exception rather than the
rule. On my Mark 3, I use Canon L glass, their pro-grade
lenses. These are totally worth the money and I have
gotten many amazing shots because of the ability of the camera
to rapidly focus on objects.
On the Oly, things are
a bit different. There are very few really good native MFT
lenses (my opinion), but there are many fully acceptable
lenses. Plus, the MFT camera design is such that it is
possible to use existing excellent lenses from other cameras on
the MFT bodies (with a lens manufacturer specific
adapter). When using these non-native lenses, you have to
run the camera in either Aperture-priority mode of fully
manual. But, for astrophotography, that does not matter as
you normally run the camera in manual mode anyway. And,
any auto-focus in the lens will not work either, but again a
non-issue as it is virtually impossible to auto-focus on
stars. In my lens bag I have several Olympus native lenses
that can be set to manual focus mode. I also have a
Voightlander 17.5mm that is fully manual and a Rokinon 7.5mm
manual fisheye. Finally, I use several Zeiss lenses
migrated from my Leica M8 (28, 35mm) and a Canon FD mount 50mm
and 300mm lenses.
Click here to see the tracking mount used for my
Astrophotgraphs.
For the photos that I
have taken, there are basically 2 different setups: guided and
unguided. For the unguided case, it further breaks down
into two sub cases that either assume that the motion
trails are intentional (a star trail photo, for instance) or the
exposure times are too short to be a factor in the final photo
quality (for example a full moon photo). In the unguided
case, the world is simple. Put the camera on a tripod or
mount, point it at the target, determine the focus, aperture and
exposure length and pull the trigger. What results in the
photo that you show to others.
In the guided case,
things are a bit more complex. First, you must obtain a
sufficient polar alignment of the tracking mount. This can
be performed by a number of methods including use of a
calibrated polar alignment scope, use of automated alignment
software or the "drift alignment" technique. Each of these
techniques have advantages and disadvantages based on your
specific objective. Specifically, if taking short exposure
photos with a short focal length lens, sloppy alignment will
work almost as well as a precise alignment. But, as either
the focal length ("zoom") of the lens increases or the length of
exposure increases or both, a high precision alignment becomes
critical to preventing slurring due to motion of the stars
relative to the camera.
To help reduce the
precision tracking requirements, it is now possible (with the
correct software application) to "stack" multiple images into
one long-exposure image. By taking a series of short
duration photos of the same object and stacking them together,
the effect of the motion slurring can be reduced or
eliminated. Stacking can help bring out subtle details not
visible in any single photo while averaging out pixel noise
resulting from thermal noise in the CCD imaging chip.
These
photos have been accumulated over the years on a variety of
equipment. Where known, I have listed the setup and
location. Not all photos are created equal, of course, as
my equipment set, equipment and techniques have changed.
In the photos below, where appropriate, I have included the
full-sized image, but set the display size to fit a normal web
page. By clicking on the image, you can see the full-size
image. Enjoy.
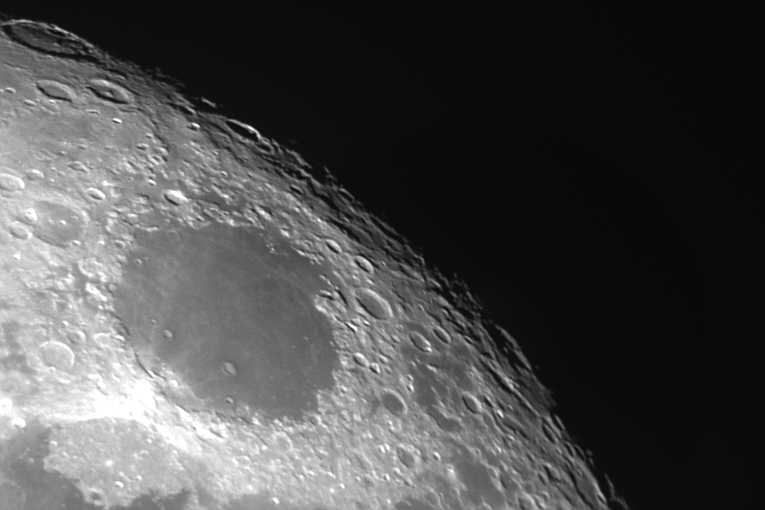
In the 1999 time frame, I purchased a Meade LX-200 10" SCT telescope. At the time (and even today) that decision was ill-conceived as the scope is big and difficult to move around. And, given where we live, viewing conditions are never optimal due to marine aerosols and light pollution. I also discovered that attempting to use the scope visually via the eye piece presents all sorts of discomfort ranging from assuming unnatural positions to suffering the cold and bug bites. So, my solution was to get a camera to attach to the scope. I did get an early, low-pixel count camera, but as always that generated other, more complex problems. Technical issues aside, the camera did work, but obtaining critical focus was difficult. Above is a shot of the moon that was made after a number of focusing iterations.
Managing contrast, focus and overall exposure proved
challenging. This photo shows less acute focusing and
general under-exposure.
The CCD camera, from Santa Barbara Instrument Group
(SBIG) required a computer for operation, so the simple act of
having a computer in the field made things more complex.
Back then, camera operation was an iterative process that was
both tedious and time-consuming.
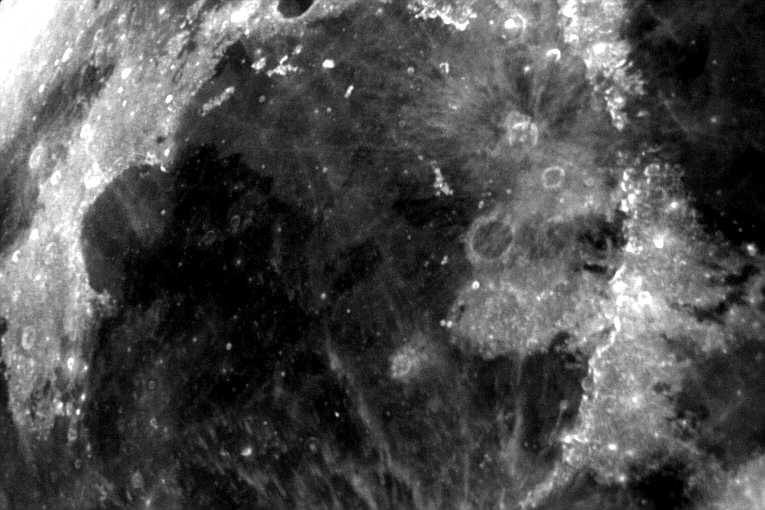
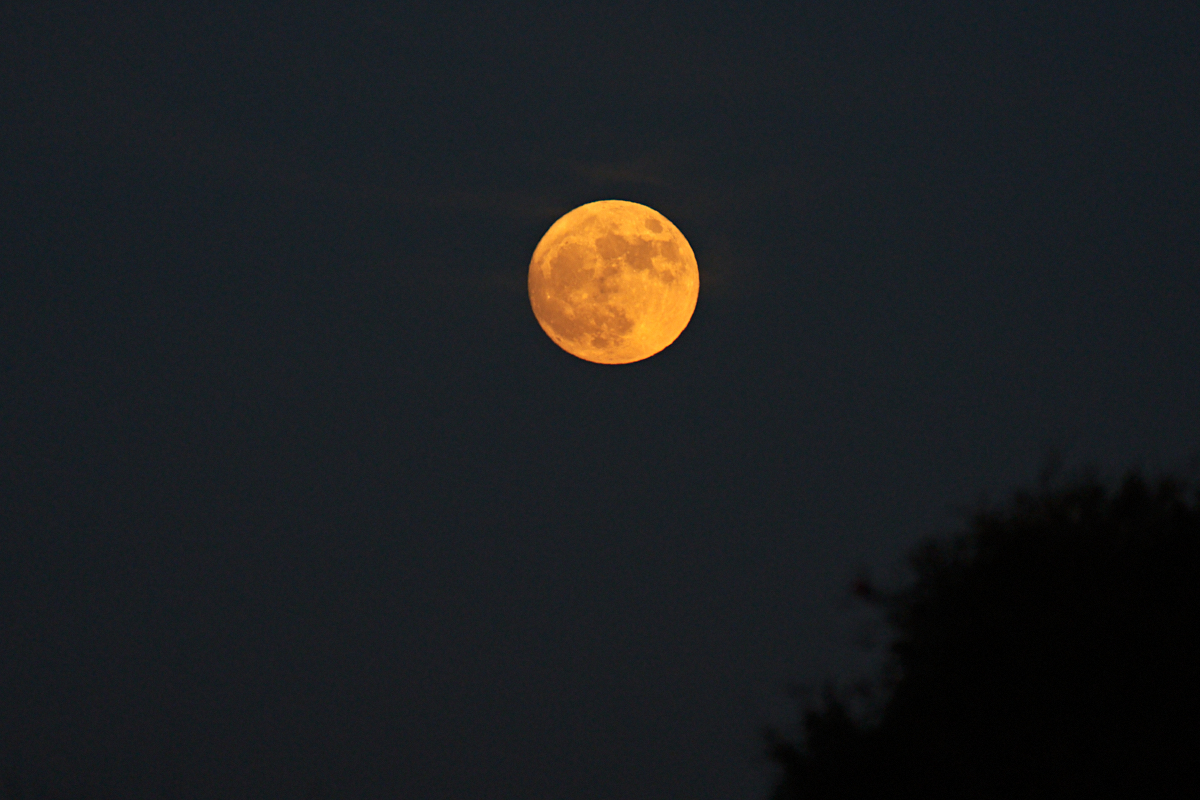
Digital cameras became commonplace and taking photos
became easier. Above is a moon photo taken in 2007 in
Seattle from the balcony of my apartment. Canon 1Ds Mark 2
with 28-300mm lens.
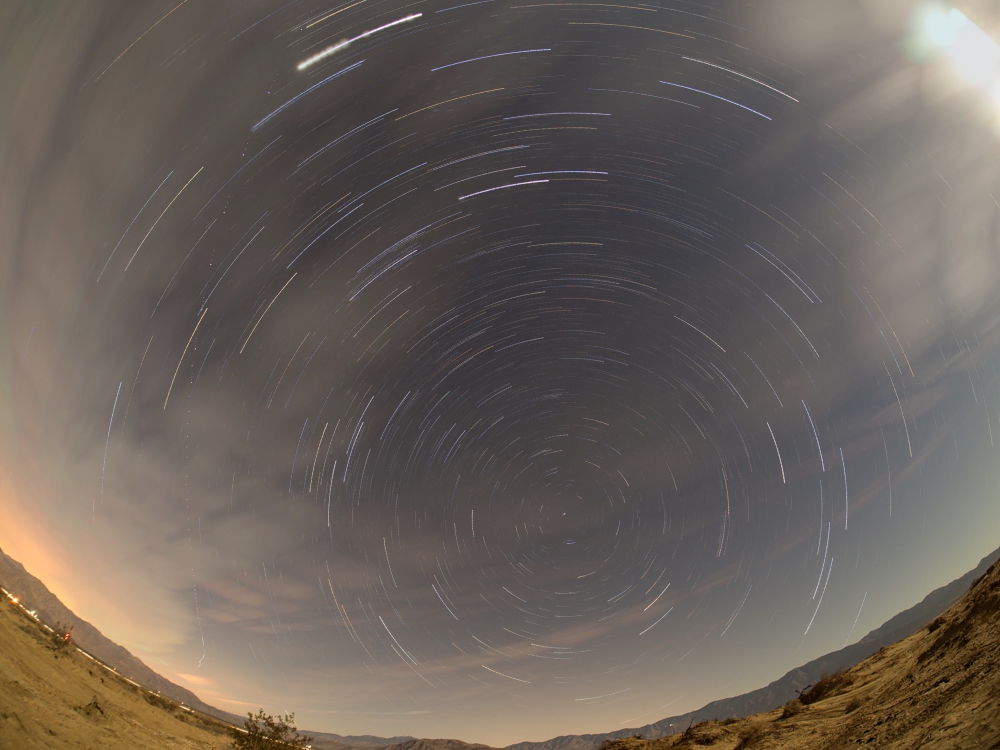
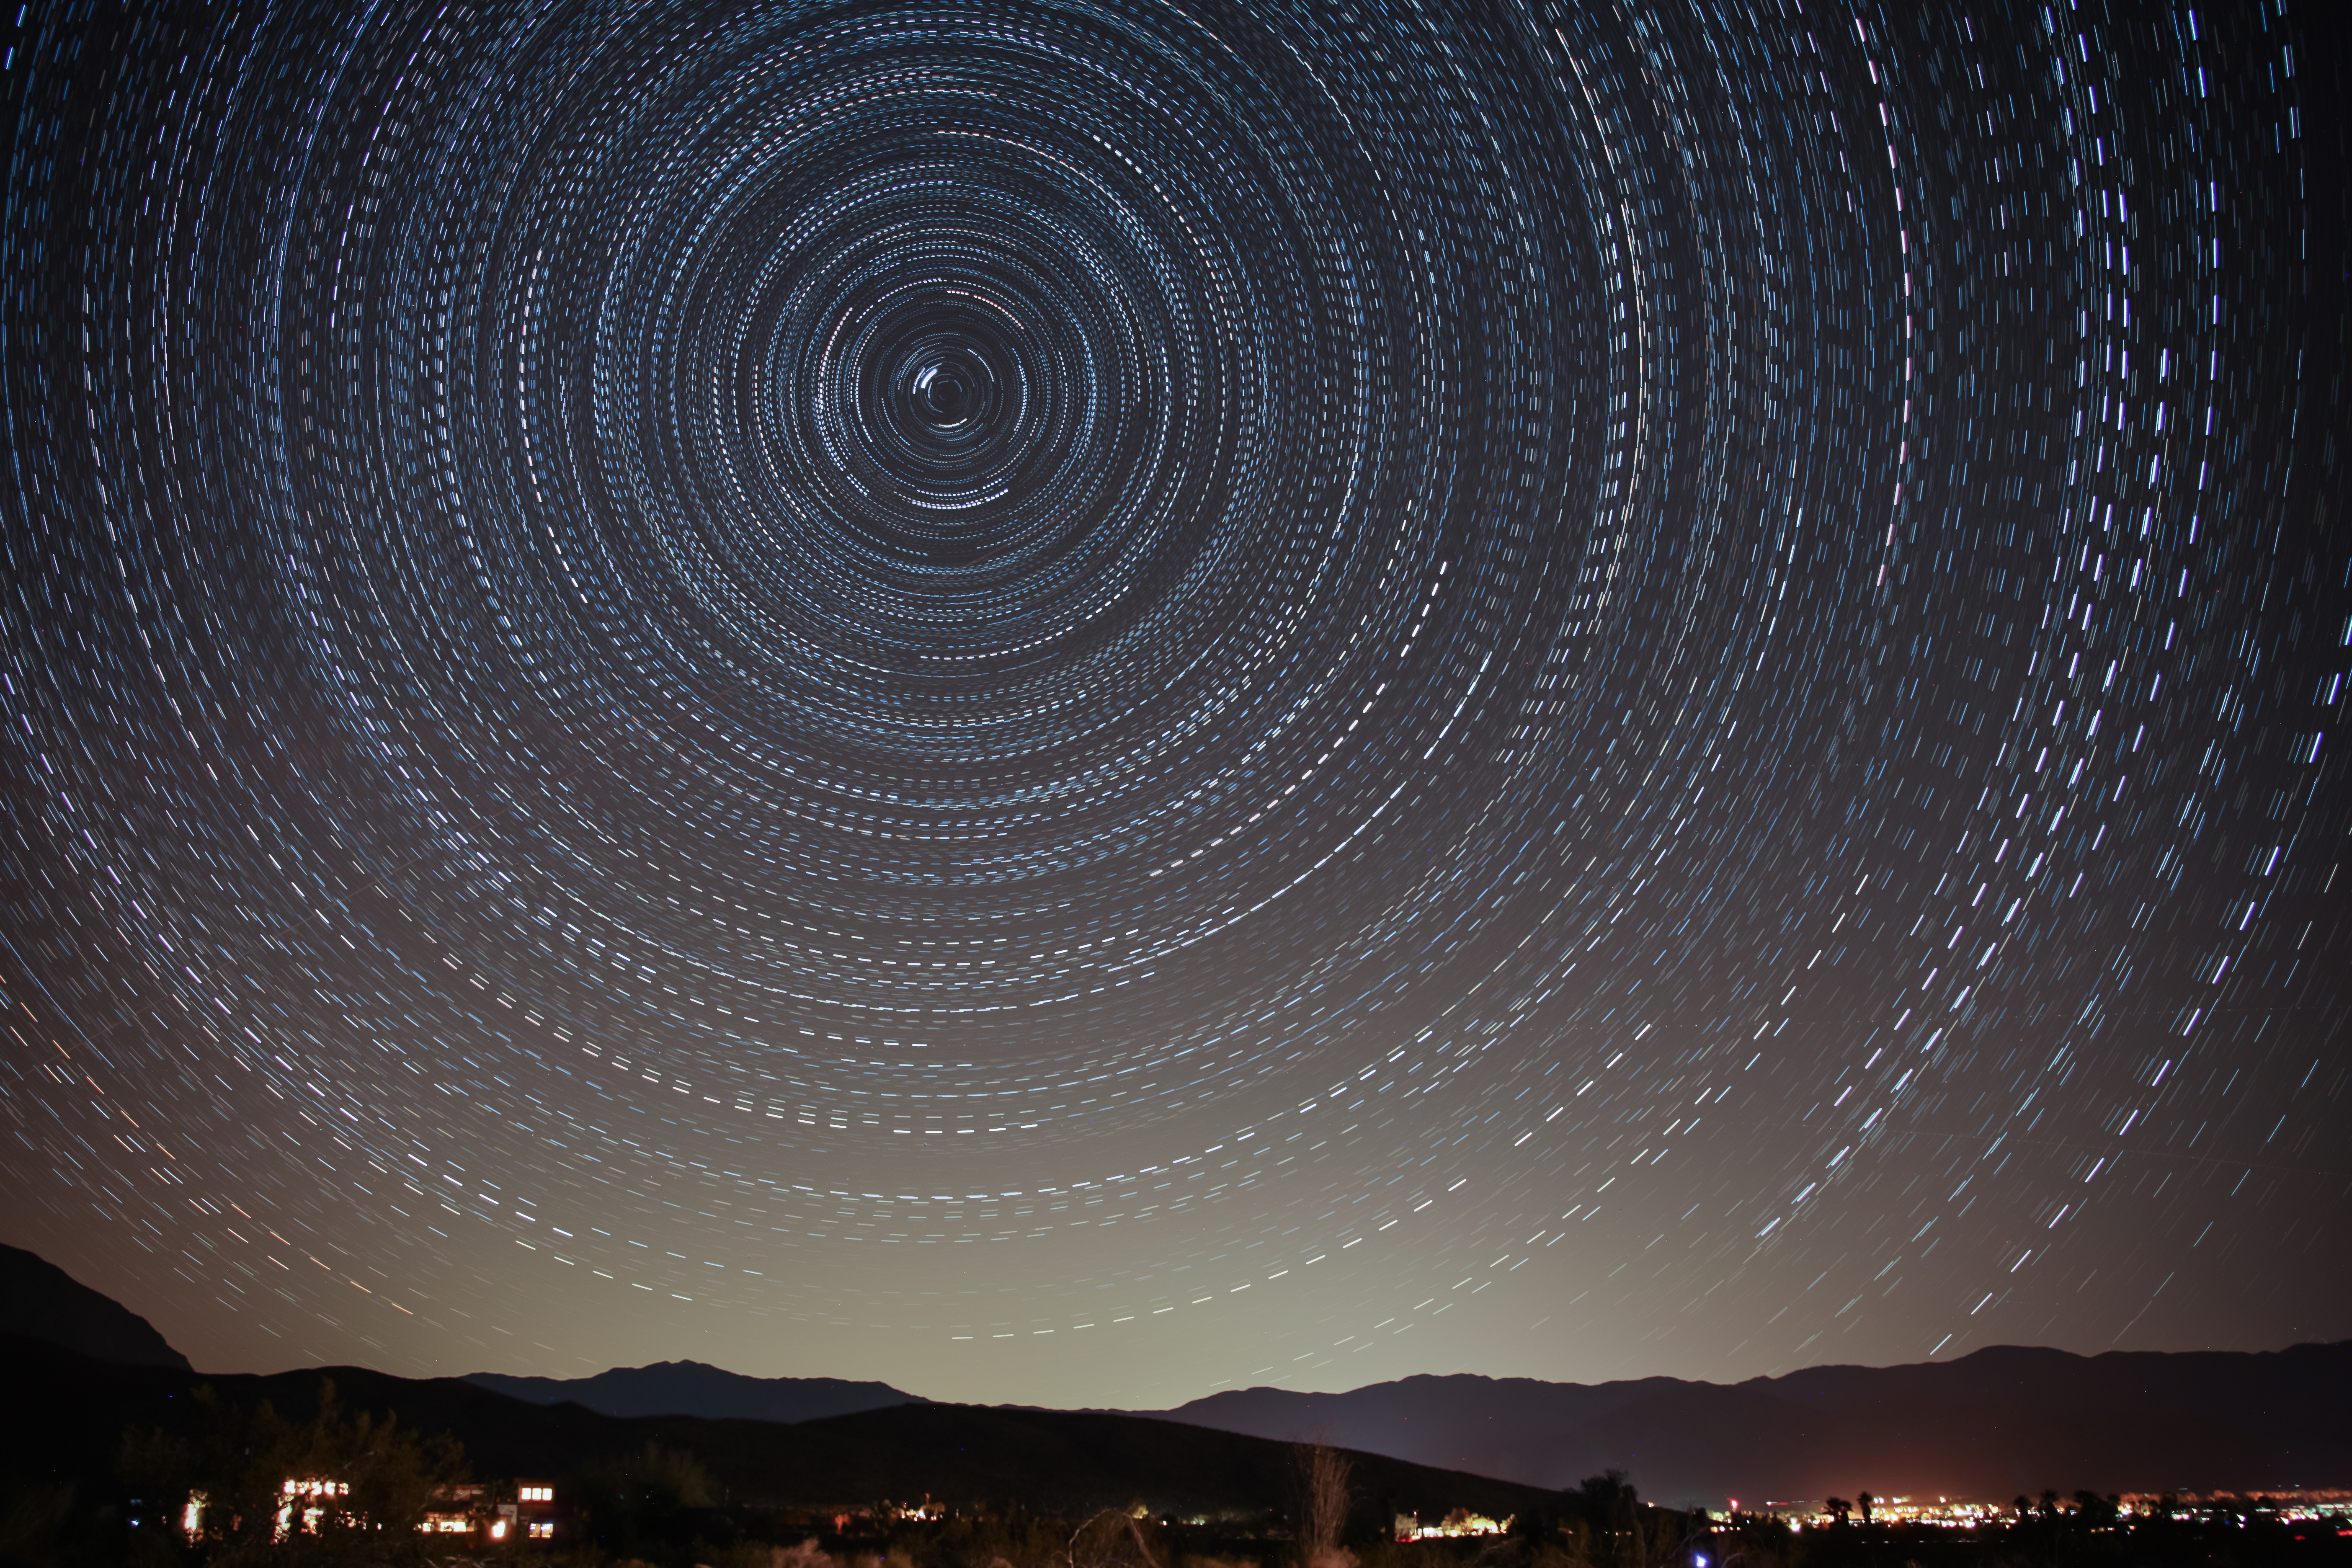
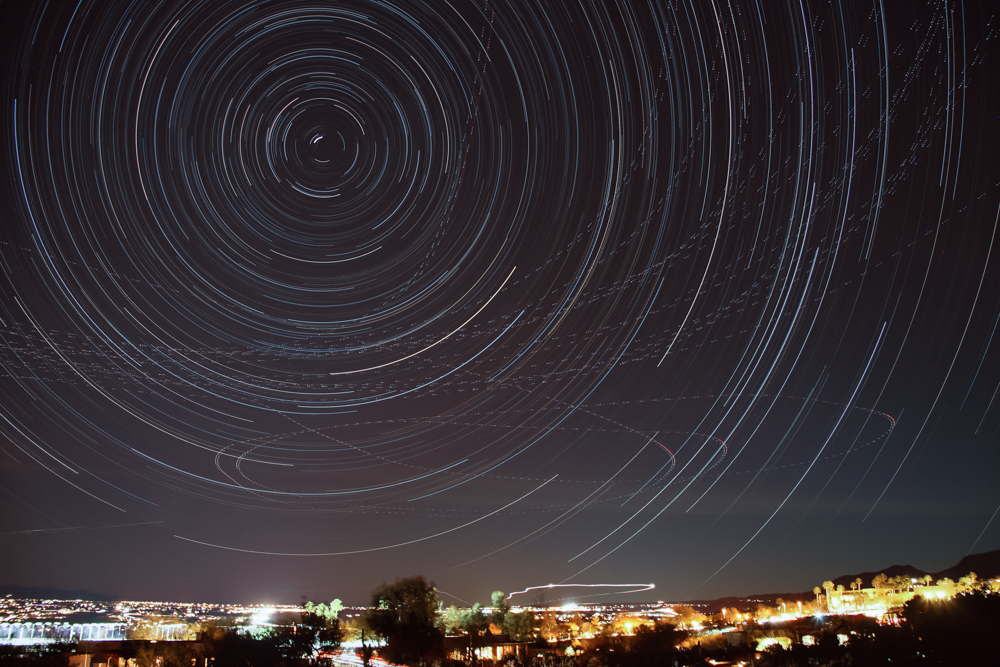
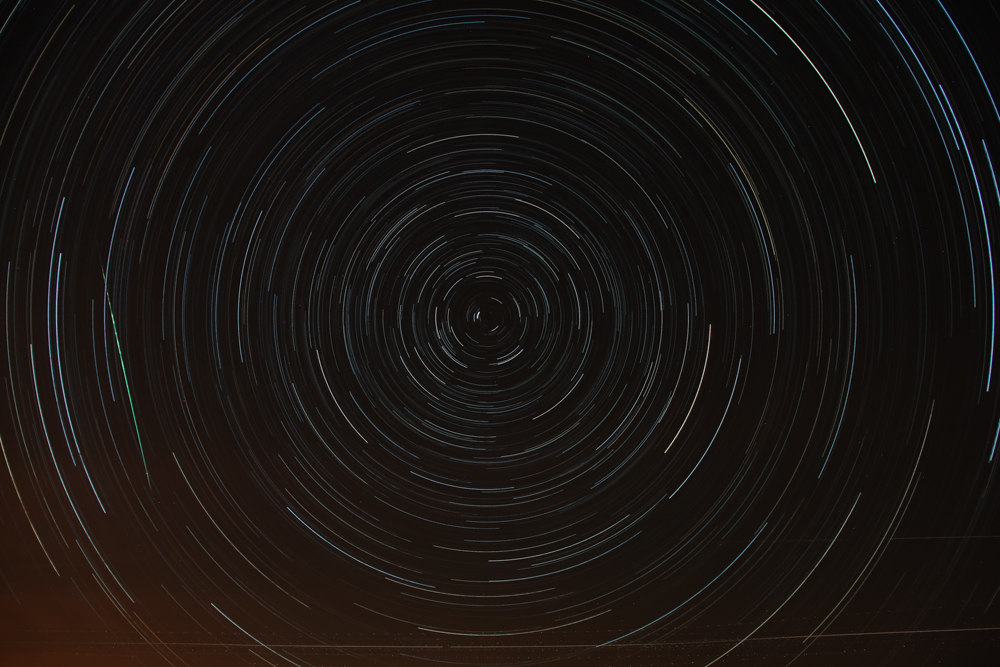
20121231. By some quirk of fate, I stumbled upon a blog that discussed taking photos that show star trails. Reading the blog with interest, I attempted to take a star trail photo with my Olympus OM-D EM-5 digital camera. The photo above was taken on New Year's Eve 2013 in Borrego Springs, CA. Rokinon 7.5mm f/3.5 lens on EM-5 camera. This photo is a "stack" (additive digital superposition) of 15 images, each 6 minutes long stacked using StarStax (a program specifically designed for creating star trails). The large amount of light in the photo above is due to illumination of the rising moon. Clouds were also coming over my position resulting in some odd effects. The really bright track in the photo above is the planet Jupiter. Also, the dotted light track was due to a plane that passed overhead during the photos. Other than the process of shooting and stacking a number of long exposures, the photo above was easy to produce. The camera was on a fixed tripod and was not attempting to track the stars. But, if you want to have the stars appear as points as opposed to smears, you must employ a tracking mount.
I researched and purchased a tracking mount for star
photos. I chose the Astrotrac mount because of size,
portability and tracking performance. We took the mount,
cameras and lenses to Borrego Springs and stayed at a friends
home. In the front yard I shot this set of 6 235 second
exposures of the Milky Way which were then stacked using
PixInsight. Olympus OM-D EM-5 16mp camera with Rokinon
7.5mm fisheye lens as mounted on Astrotrac tracker. The
light on the right is pollution that is coming over the Santa
Rosa mountains from Palm Springs, CA. I processed this set
of images "hard" with PixInsight to reduce the effect of the
light pollution.
While the Astrotrac was working on a set of images,
I also set up my Canon 1Ds Mark 3 21mp digital camera with
28-300mm lens to attempt to capture some star trails. The
capture worked, but only after the fact did I discover that I
had programmed the remote controller incorrectly resulting in
interruptions in the trails. But, the resulting stacked
photo was still interesting. The small city in the
foreground is Borrego Springs, CA. The light coming over
the distant mountains is from Palm Springs, CA.
I discovered a web site that specializes in the sale
of used camera equipment. The Olympus OM-D EM-5 I had
purchased some months earlier had an interesting property that
it could accept, with proper adapters, a wide variety of legacy
lenses from many manufacturers including Leica, Zeiss, Nikon and
Canon. I found an excellent deal on a used Canon 300mm FD
fully manual lens and purchased an adapter for the FD
mount. With the 300mm lens on the Oly, the resulting
"real" focal length is 600mm due to the 2X "crop factor".
To test the camera-lens combination, I setup my tripod in my
front yard and got the shot above. The photo above is a
crop of the source photo and is shown at pixel level resolution.

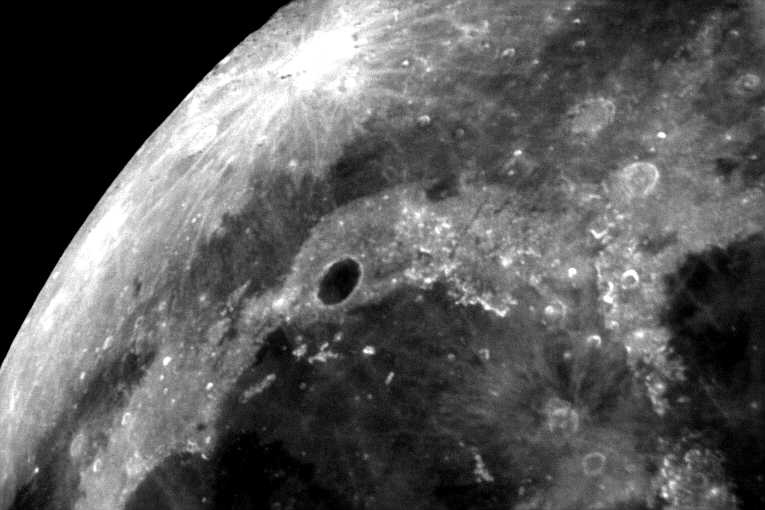
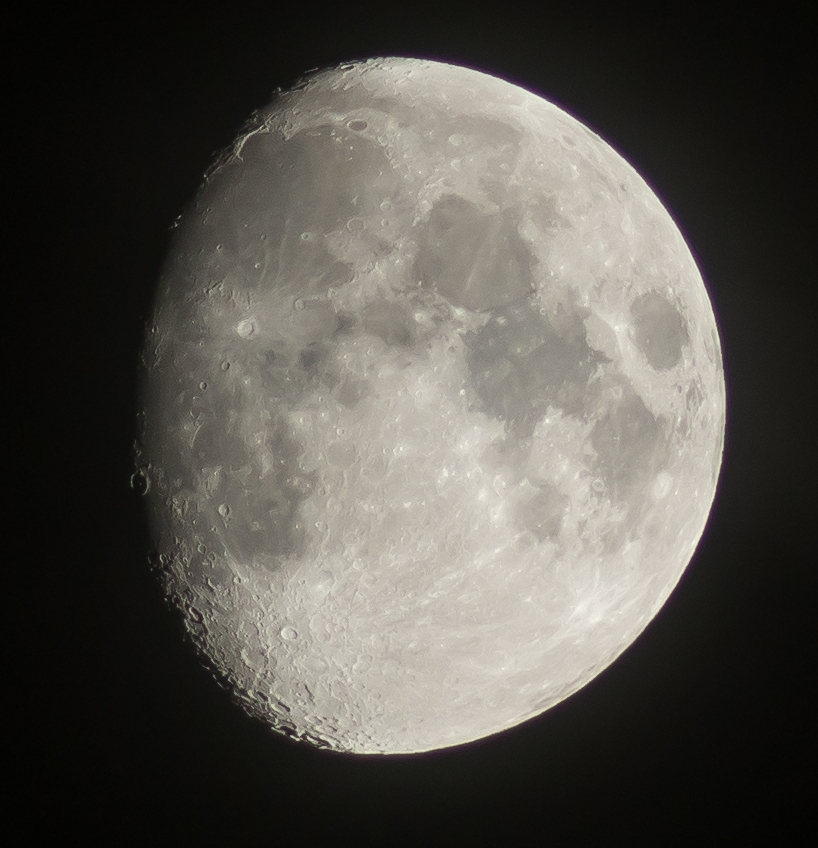
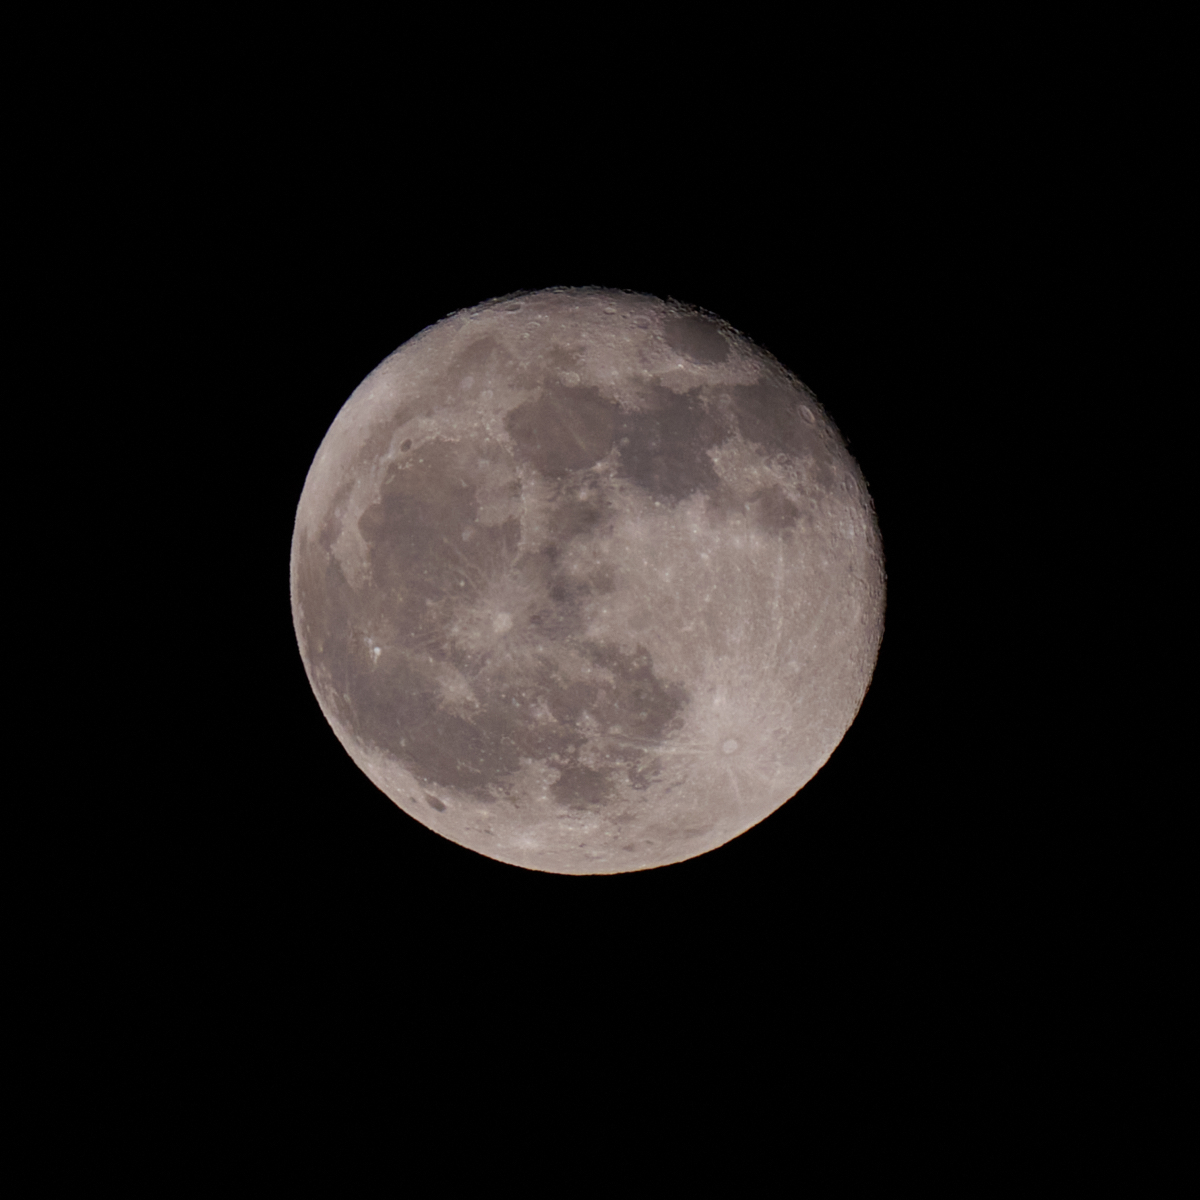
Over New Years in the desert, I got the photo above, again with the Oly/300mm Canon FD lens combo. The brightness of the full moon makes resolution of the fine detail of the moon's surface difficult and therefore the focus was not fully critical.
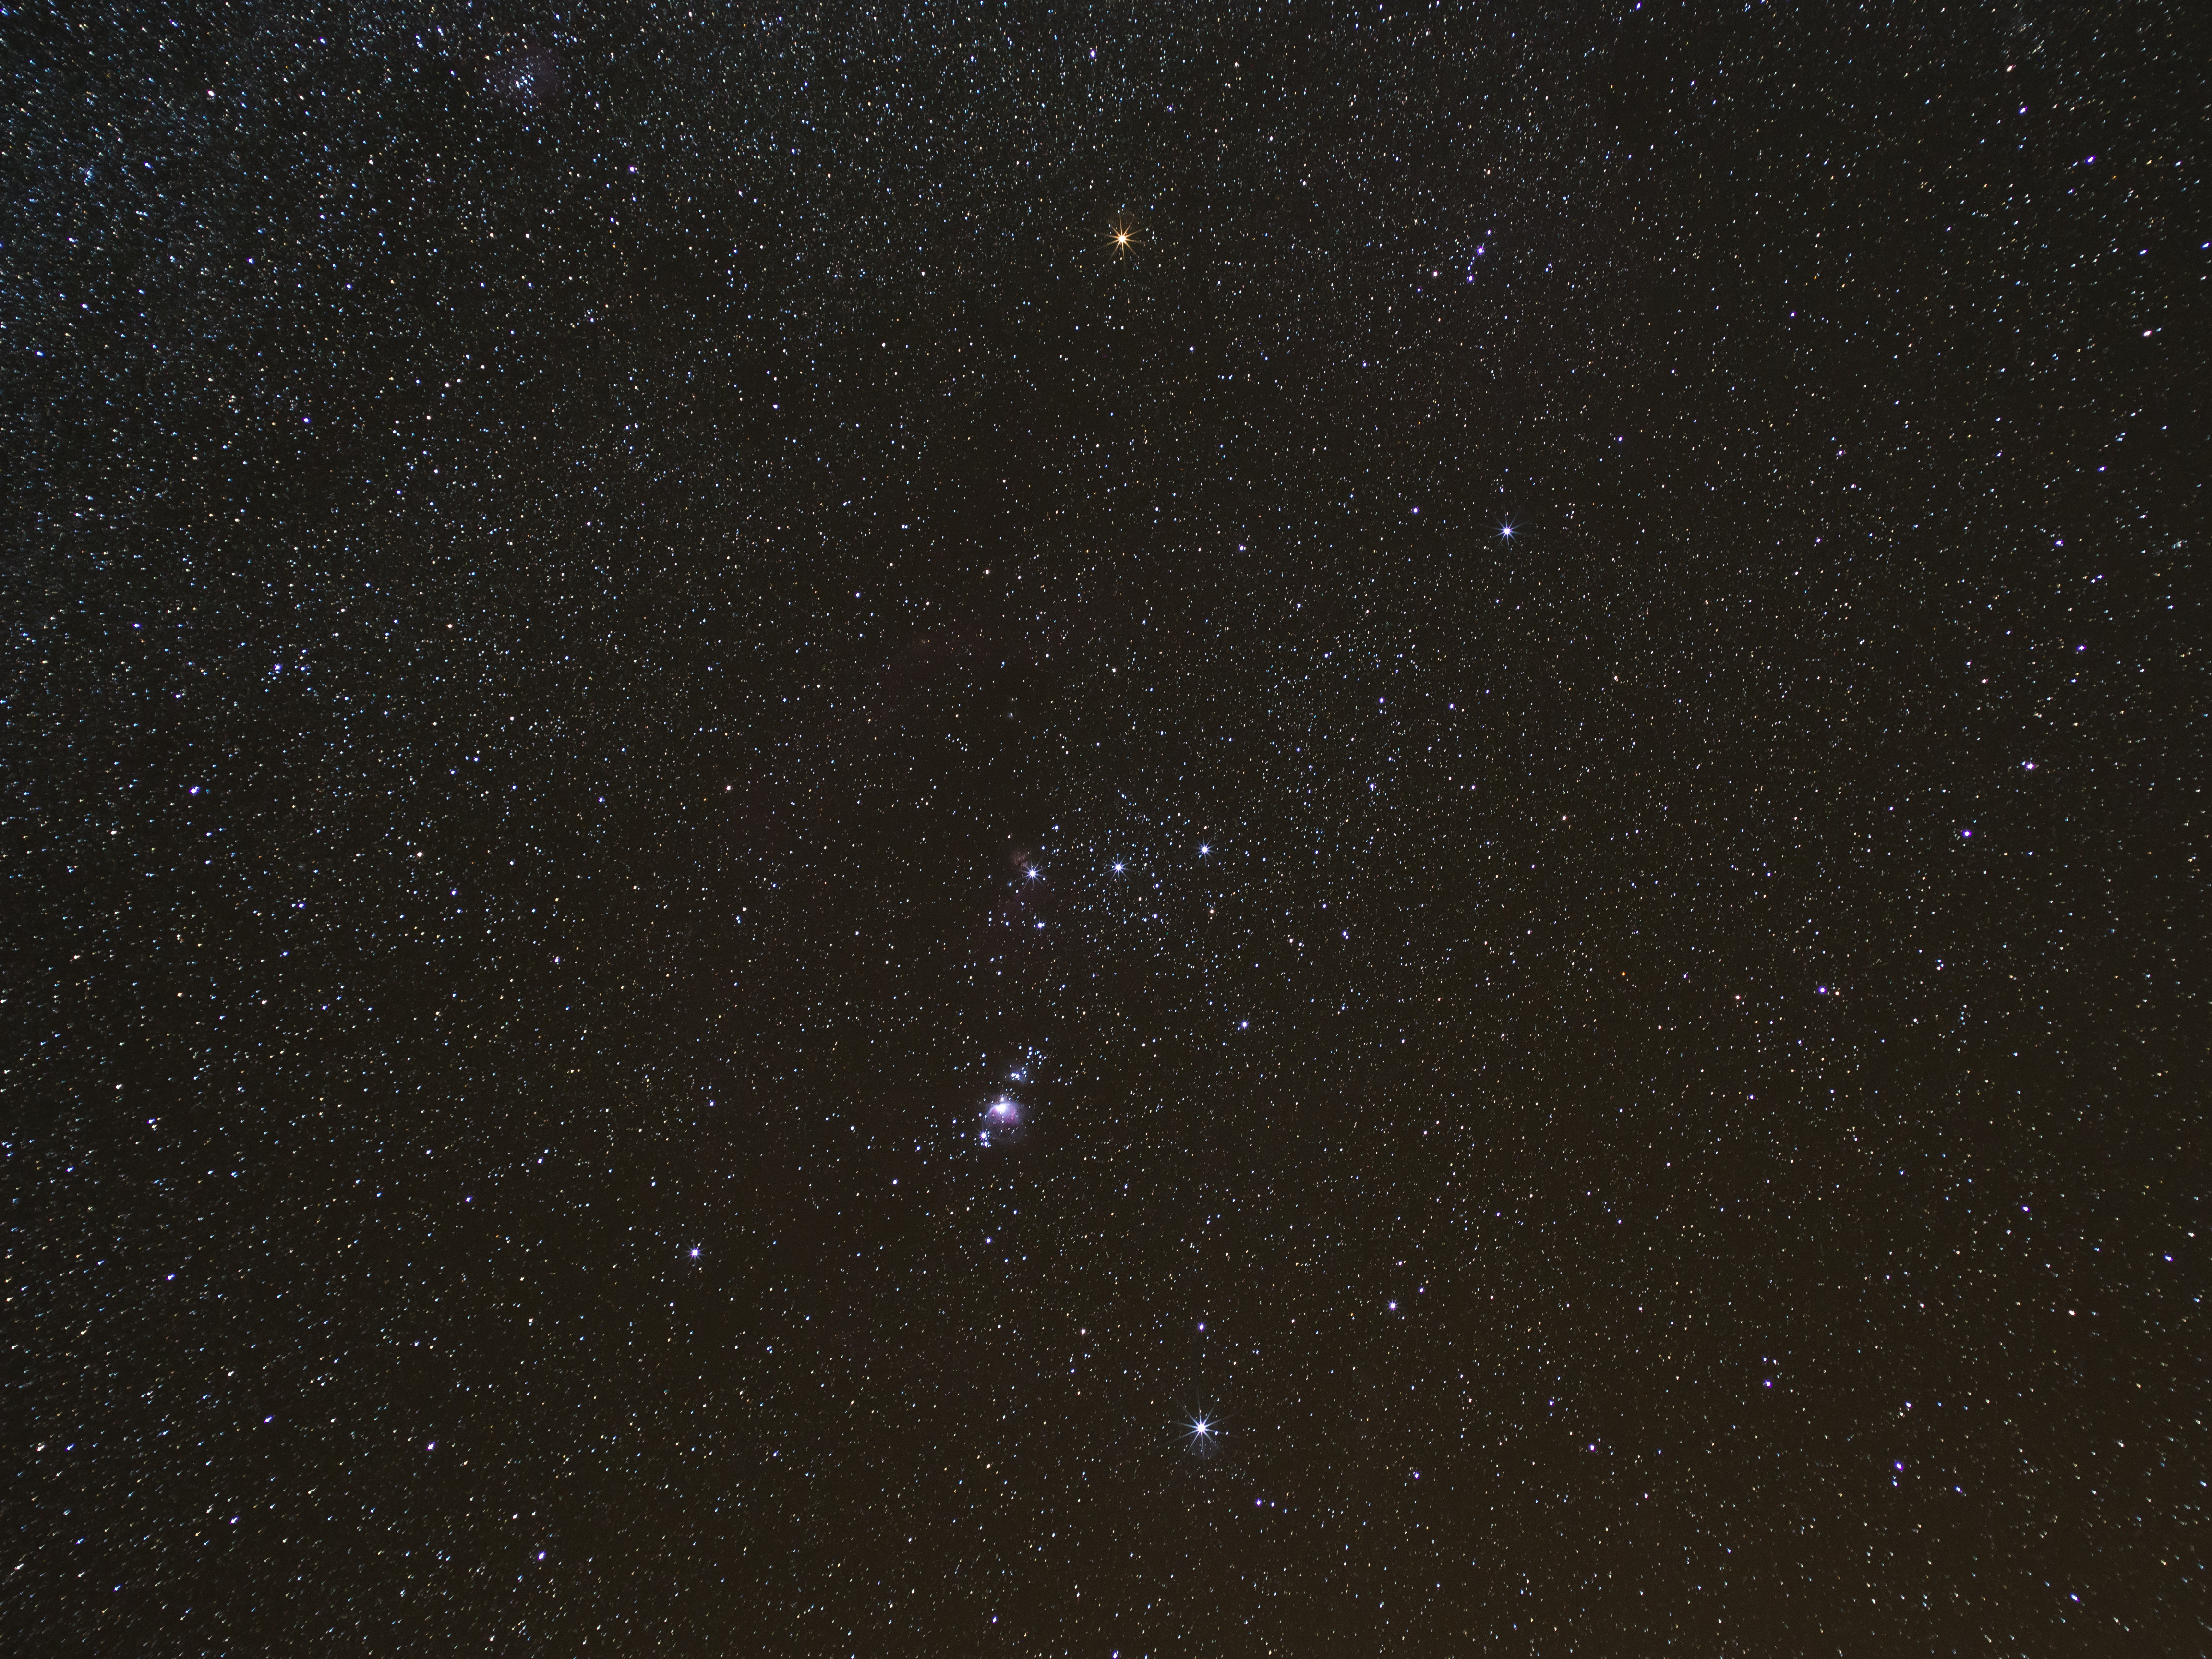
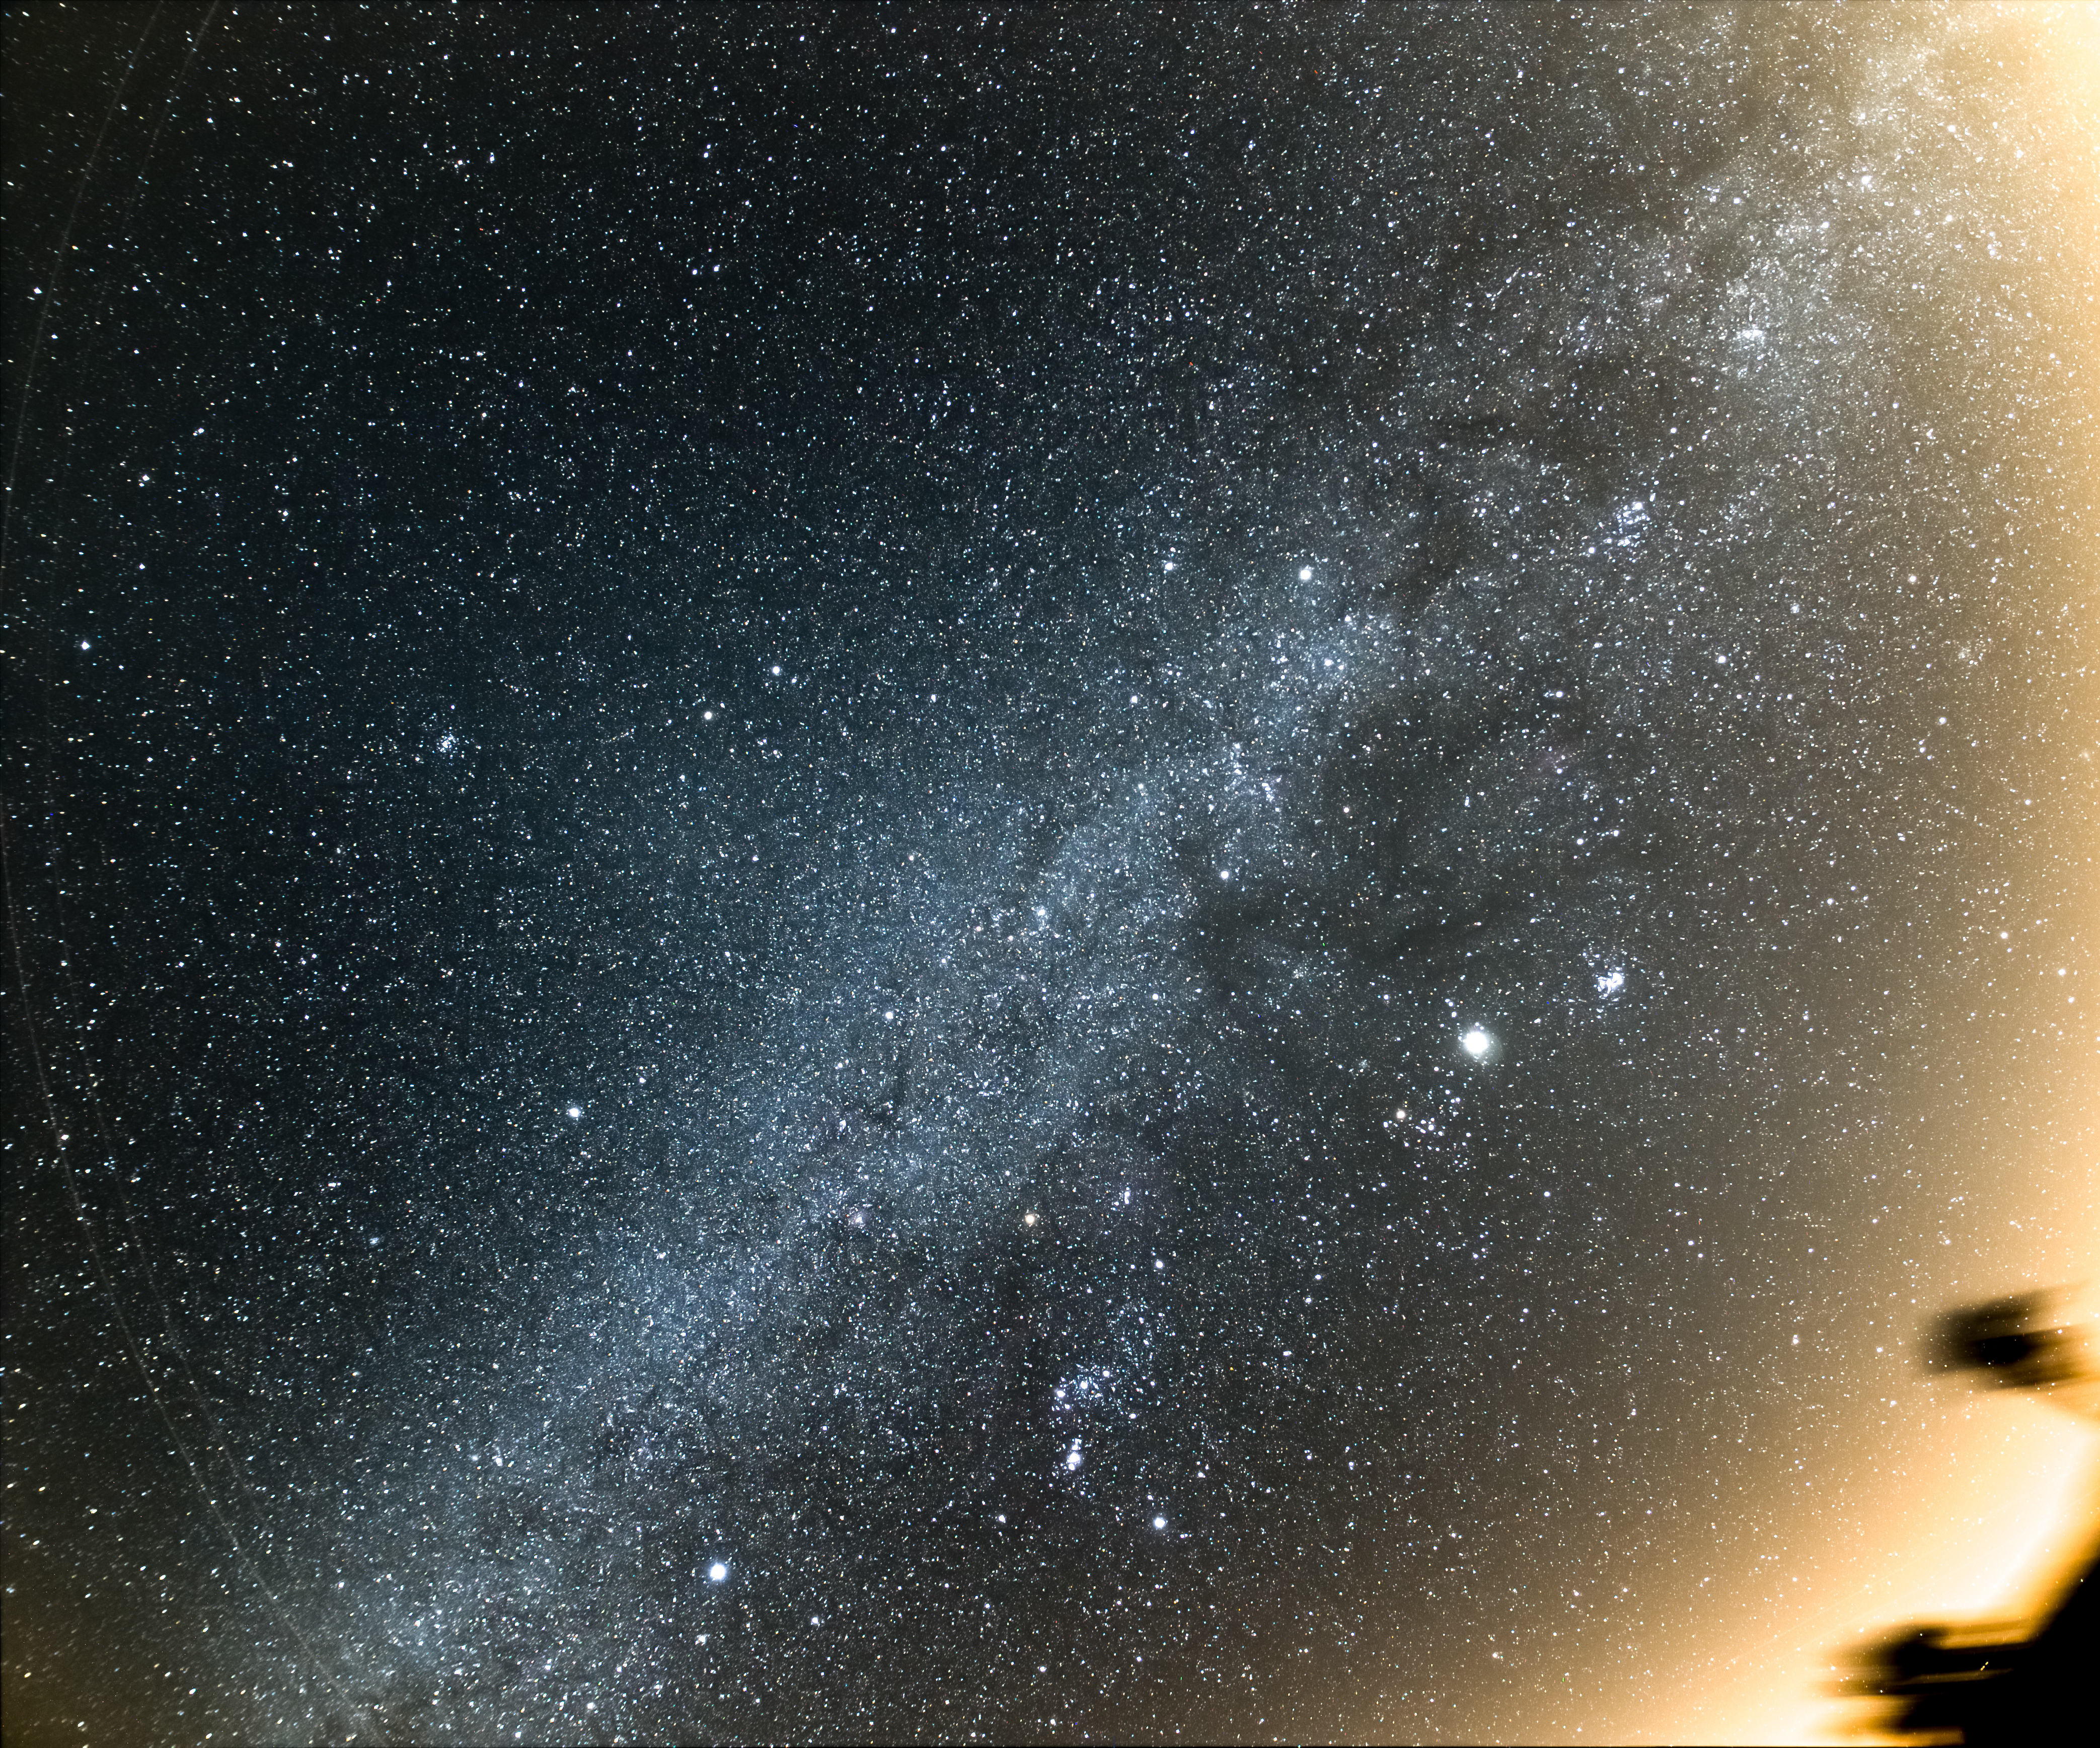
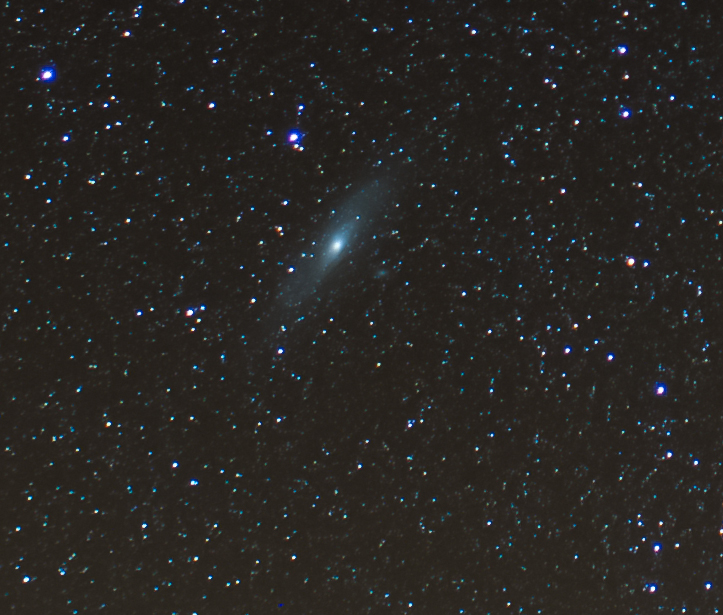
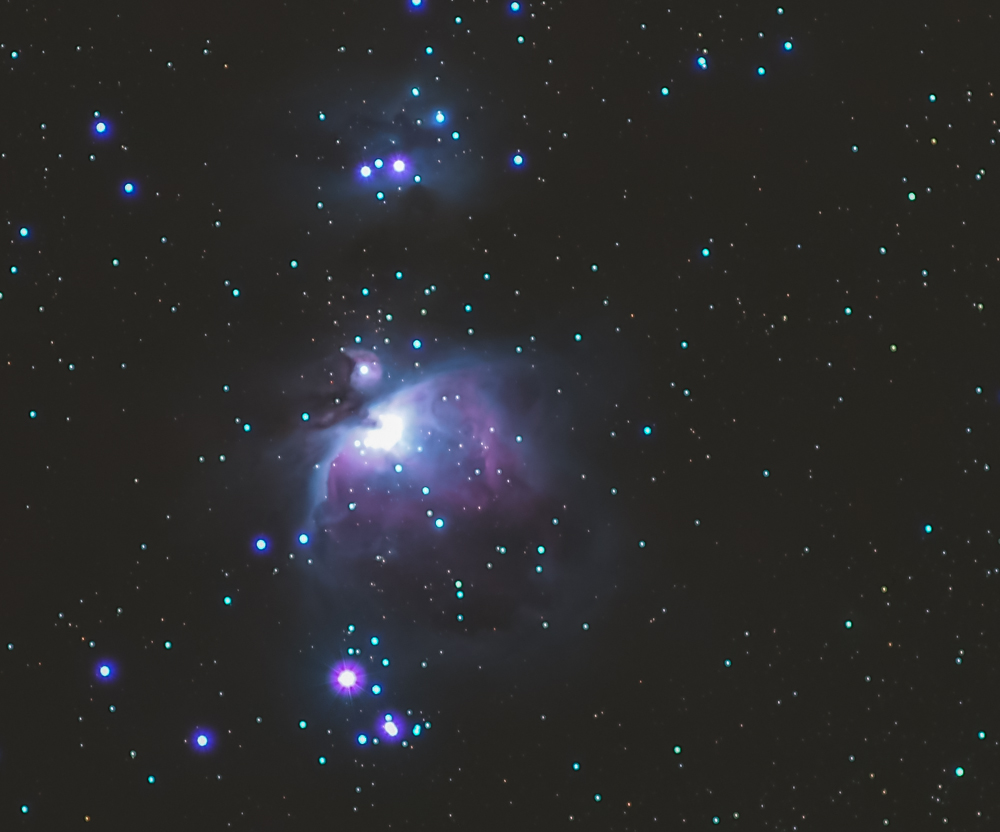
In Borrego, using the Astrotrac mount, I got the
photo above using my EM-5 camera and Zeiss 28mm M-mount lens
with adapter. The photo is a stack of 4 six minute
exposures. The crop factor of the EM-5 makes this lens
appear as a 56mm focal length lens. Orion's Belt is in the
center of the photo with the yellow star to the top being
Betelgeuse. The bright star at the bottom center is
Rigel. Just a bit less than 1/2 way between Orion's Belt
and Rigel is the Great Orion Nebula (the fuzzy object).
.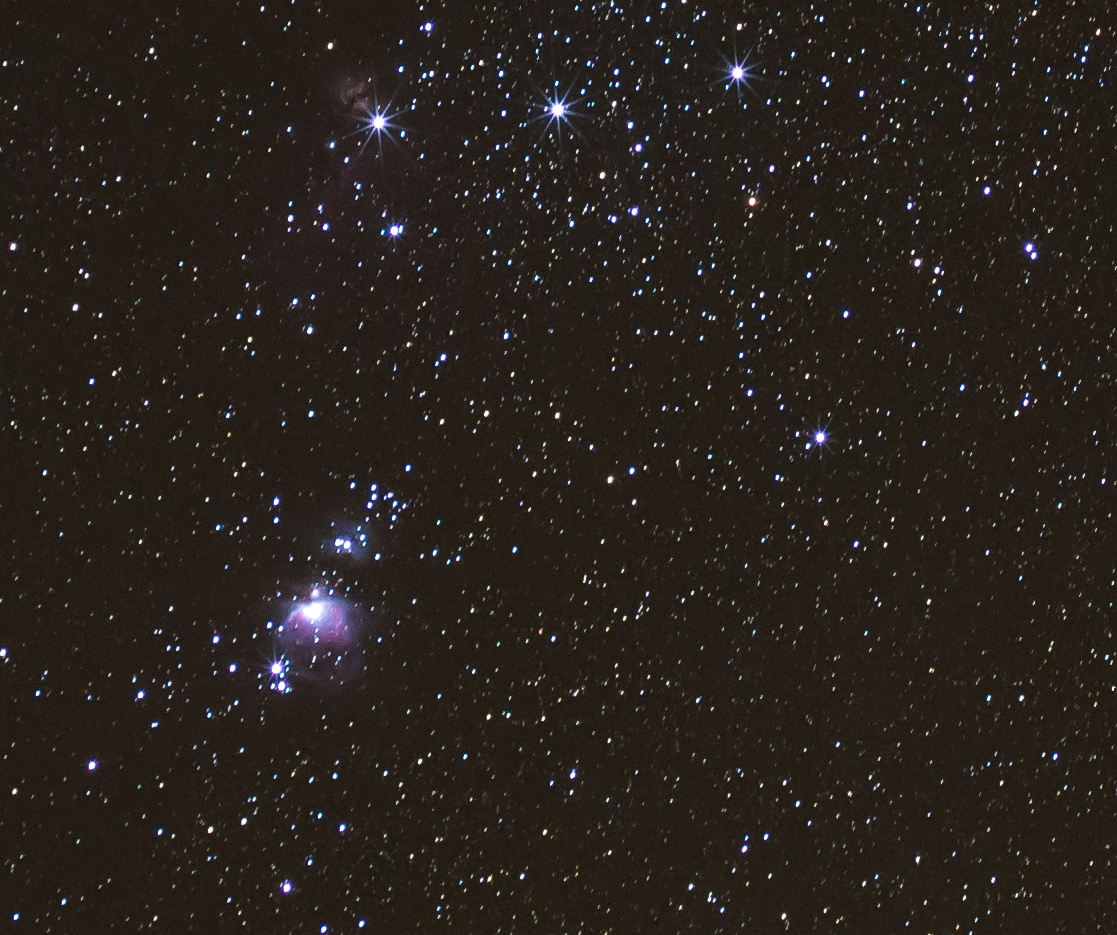
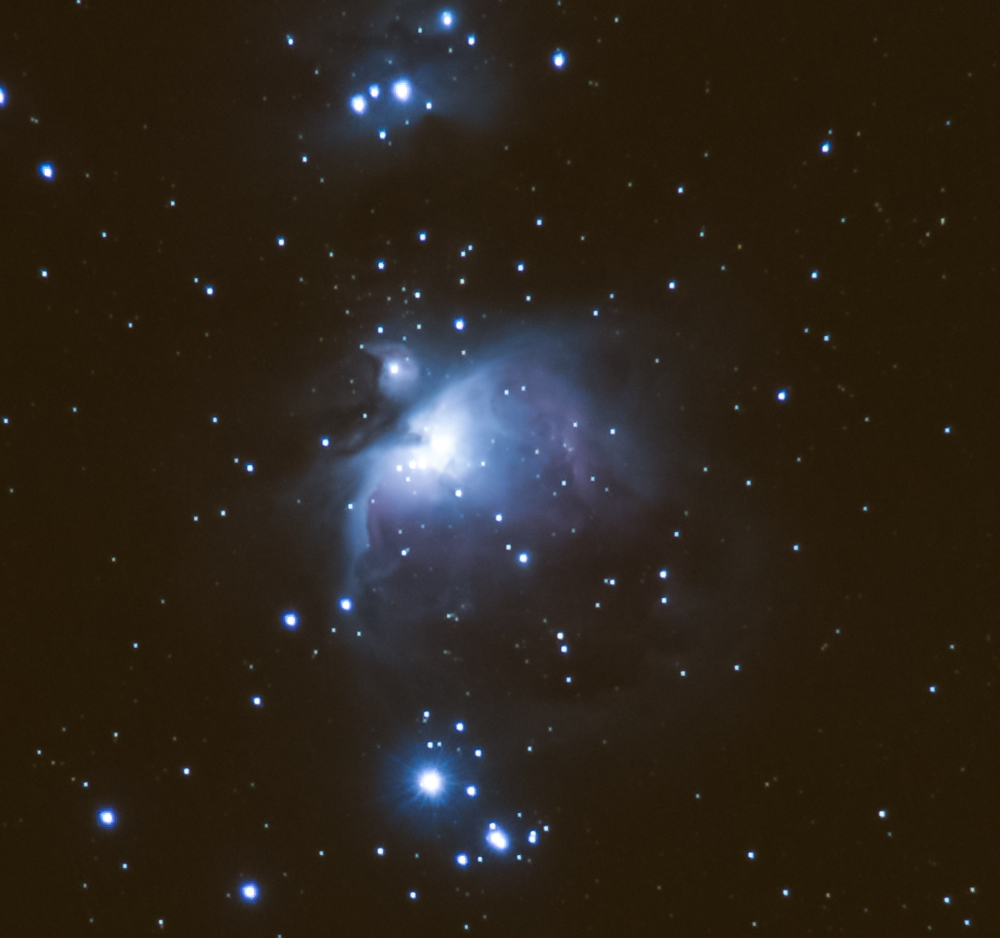
A crop of the photo above shows pixel-level details
not easily visible in the full sized photo. Note the
Horsehead nebula present near the left-most star in Orion's belt
and to the left of center. The Great Orion Nebula is the
bright area below and left of center.
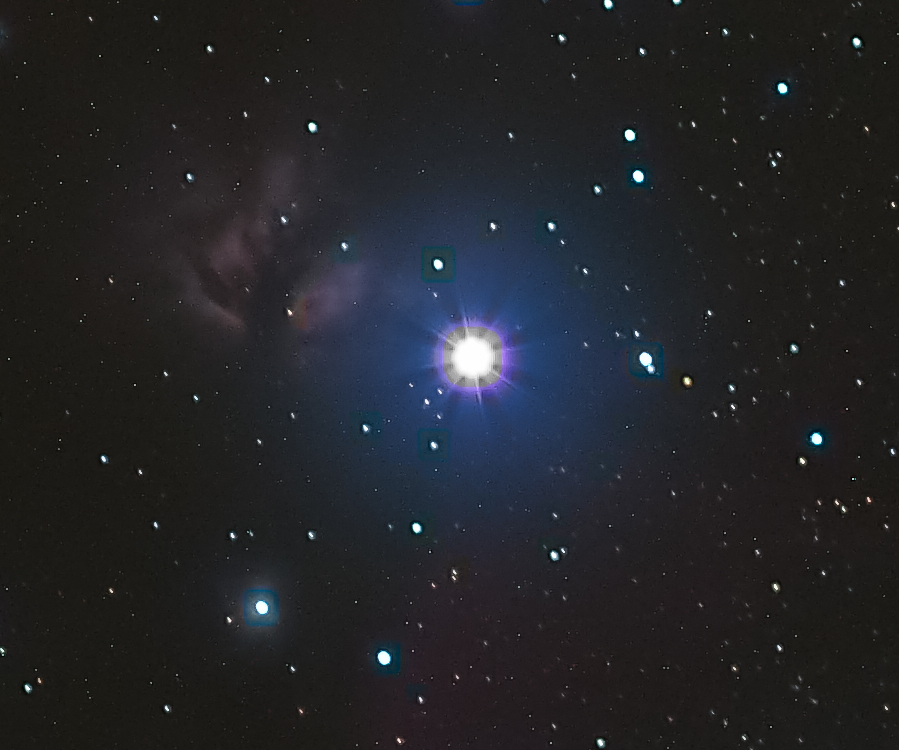
Upon seeing the photo above on my laptop, I elected
to switch to the 300mm lens for a closer look. While the
longer lens did provide more magnification, it also pointed out
that to use long lenses on the Astrotrac, you have to be precise
about polar alignment of the device. Given the slurring in
the image above, it is clear that my alignment technique needed
to be improved.
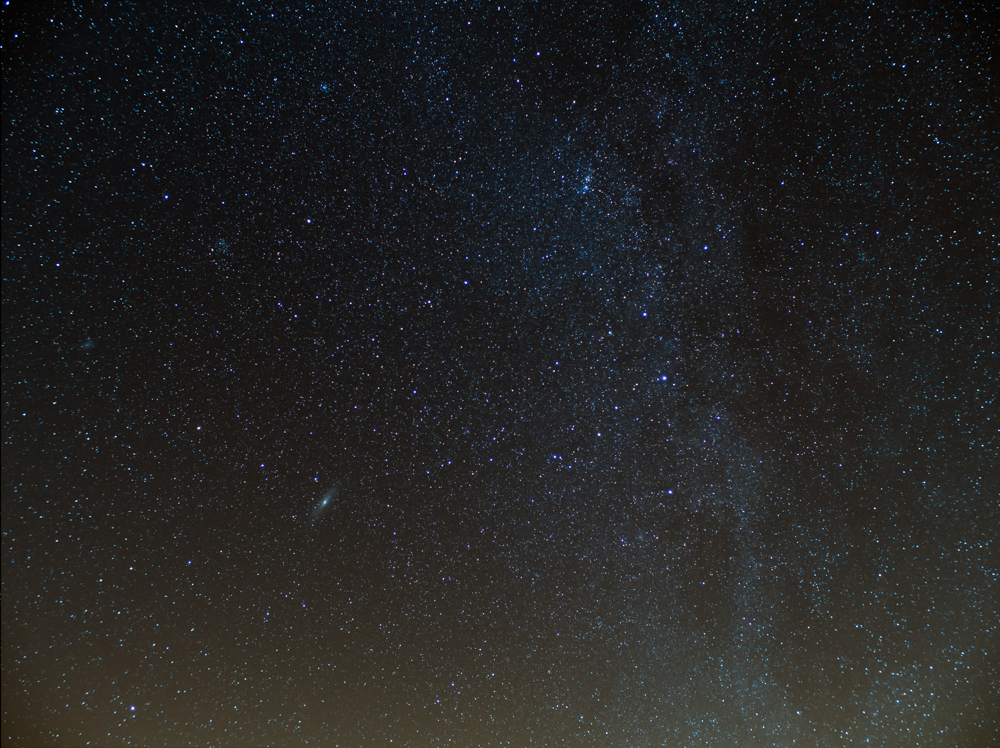
The image above was taken with my Voightlander 17.5mm f/0.9
lens on the Oly EM-5. This shows a full frame image that
was an integration of 5- 235 second exposures.
This is crop of the prior image with emphasis on the galaxy.
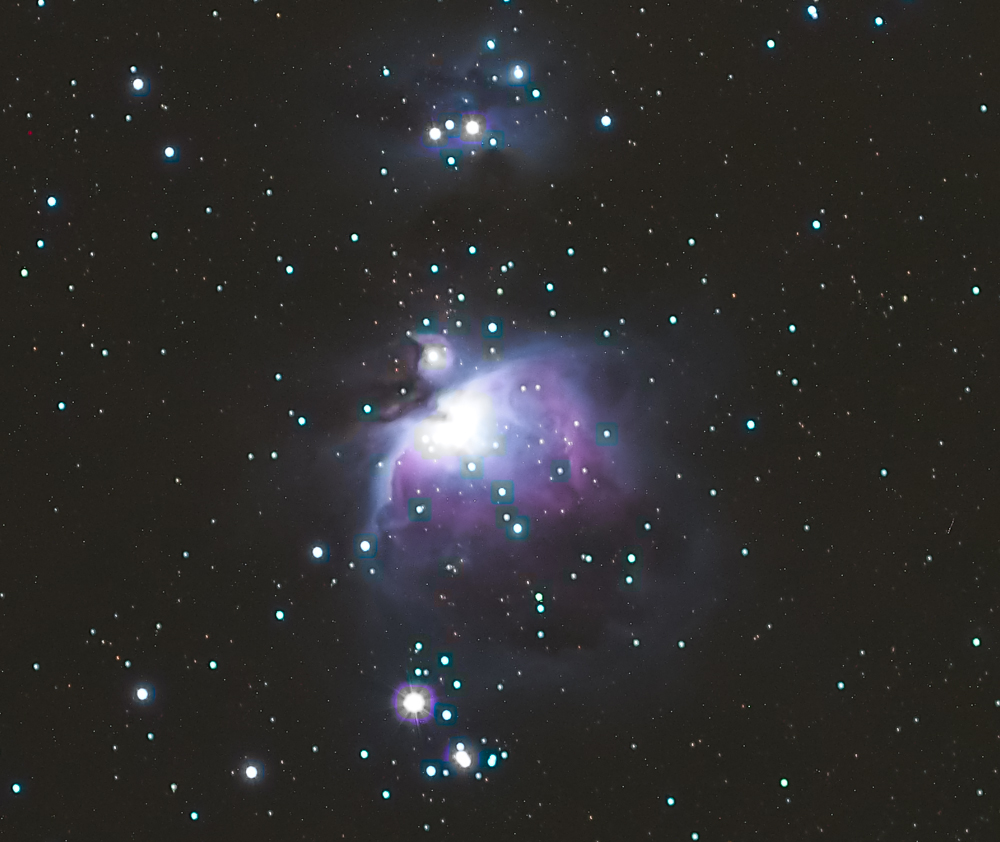
20130130. A shot of M42 was taken from my parent's place in Tucson (in the middle of the city with plenty of dirty light pollution) using the Astrotrac, Oly EM-5 camera and an Oly 14-150 f/4 zoom lens. The photo above was a stack of 12 2 minute shots at ISO 400, f/4, 150mm (300mm actual) and then stacked with PixInsight. Now, this image is not too bad, but it does show that the quality of the lens is the real issue. There is some star slurring mostly visible at the top, but the bottom stars are not distorted. Also note that the diffraction "star patterns" show the lower quality of this len. Contrast this with the Zeiss lens several photos above. That said, the camera/lens/mount combo did what I asked and produced a respectable photo. I also know that the focus as not fully on the money which is something that I attribute to nature of the lens. Note that the capture process did resolve some color in the nebula.
20130130. The photo above consisted of 72 3-minute
exposures at ISO 200 and 28mm. As shot from the roof deck
at my parent's place in Tucson. The stack was created with
PixInsight using the "max-additive" integration method.
20130302. The photo above was taken at a SDAA Tierra del
Sol star party and is only one of several that we took.
You can see both M42 and M43 in the photo above. 180mm
Leica lens on Oly EM-5 camera. 240 seconds at ISO 400.
20130302. This is an integrated stack based on the TDS
photos. There is not much, if any, additional detail in
this photo when compared to the one above it (which is
un-integrated). 180mm Leica lens on Oly EM-5 camera, 240
sec at ISO 400. Note the chromatic abberation (purple
fringes around the really bright stars).
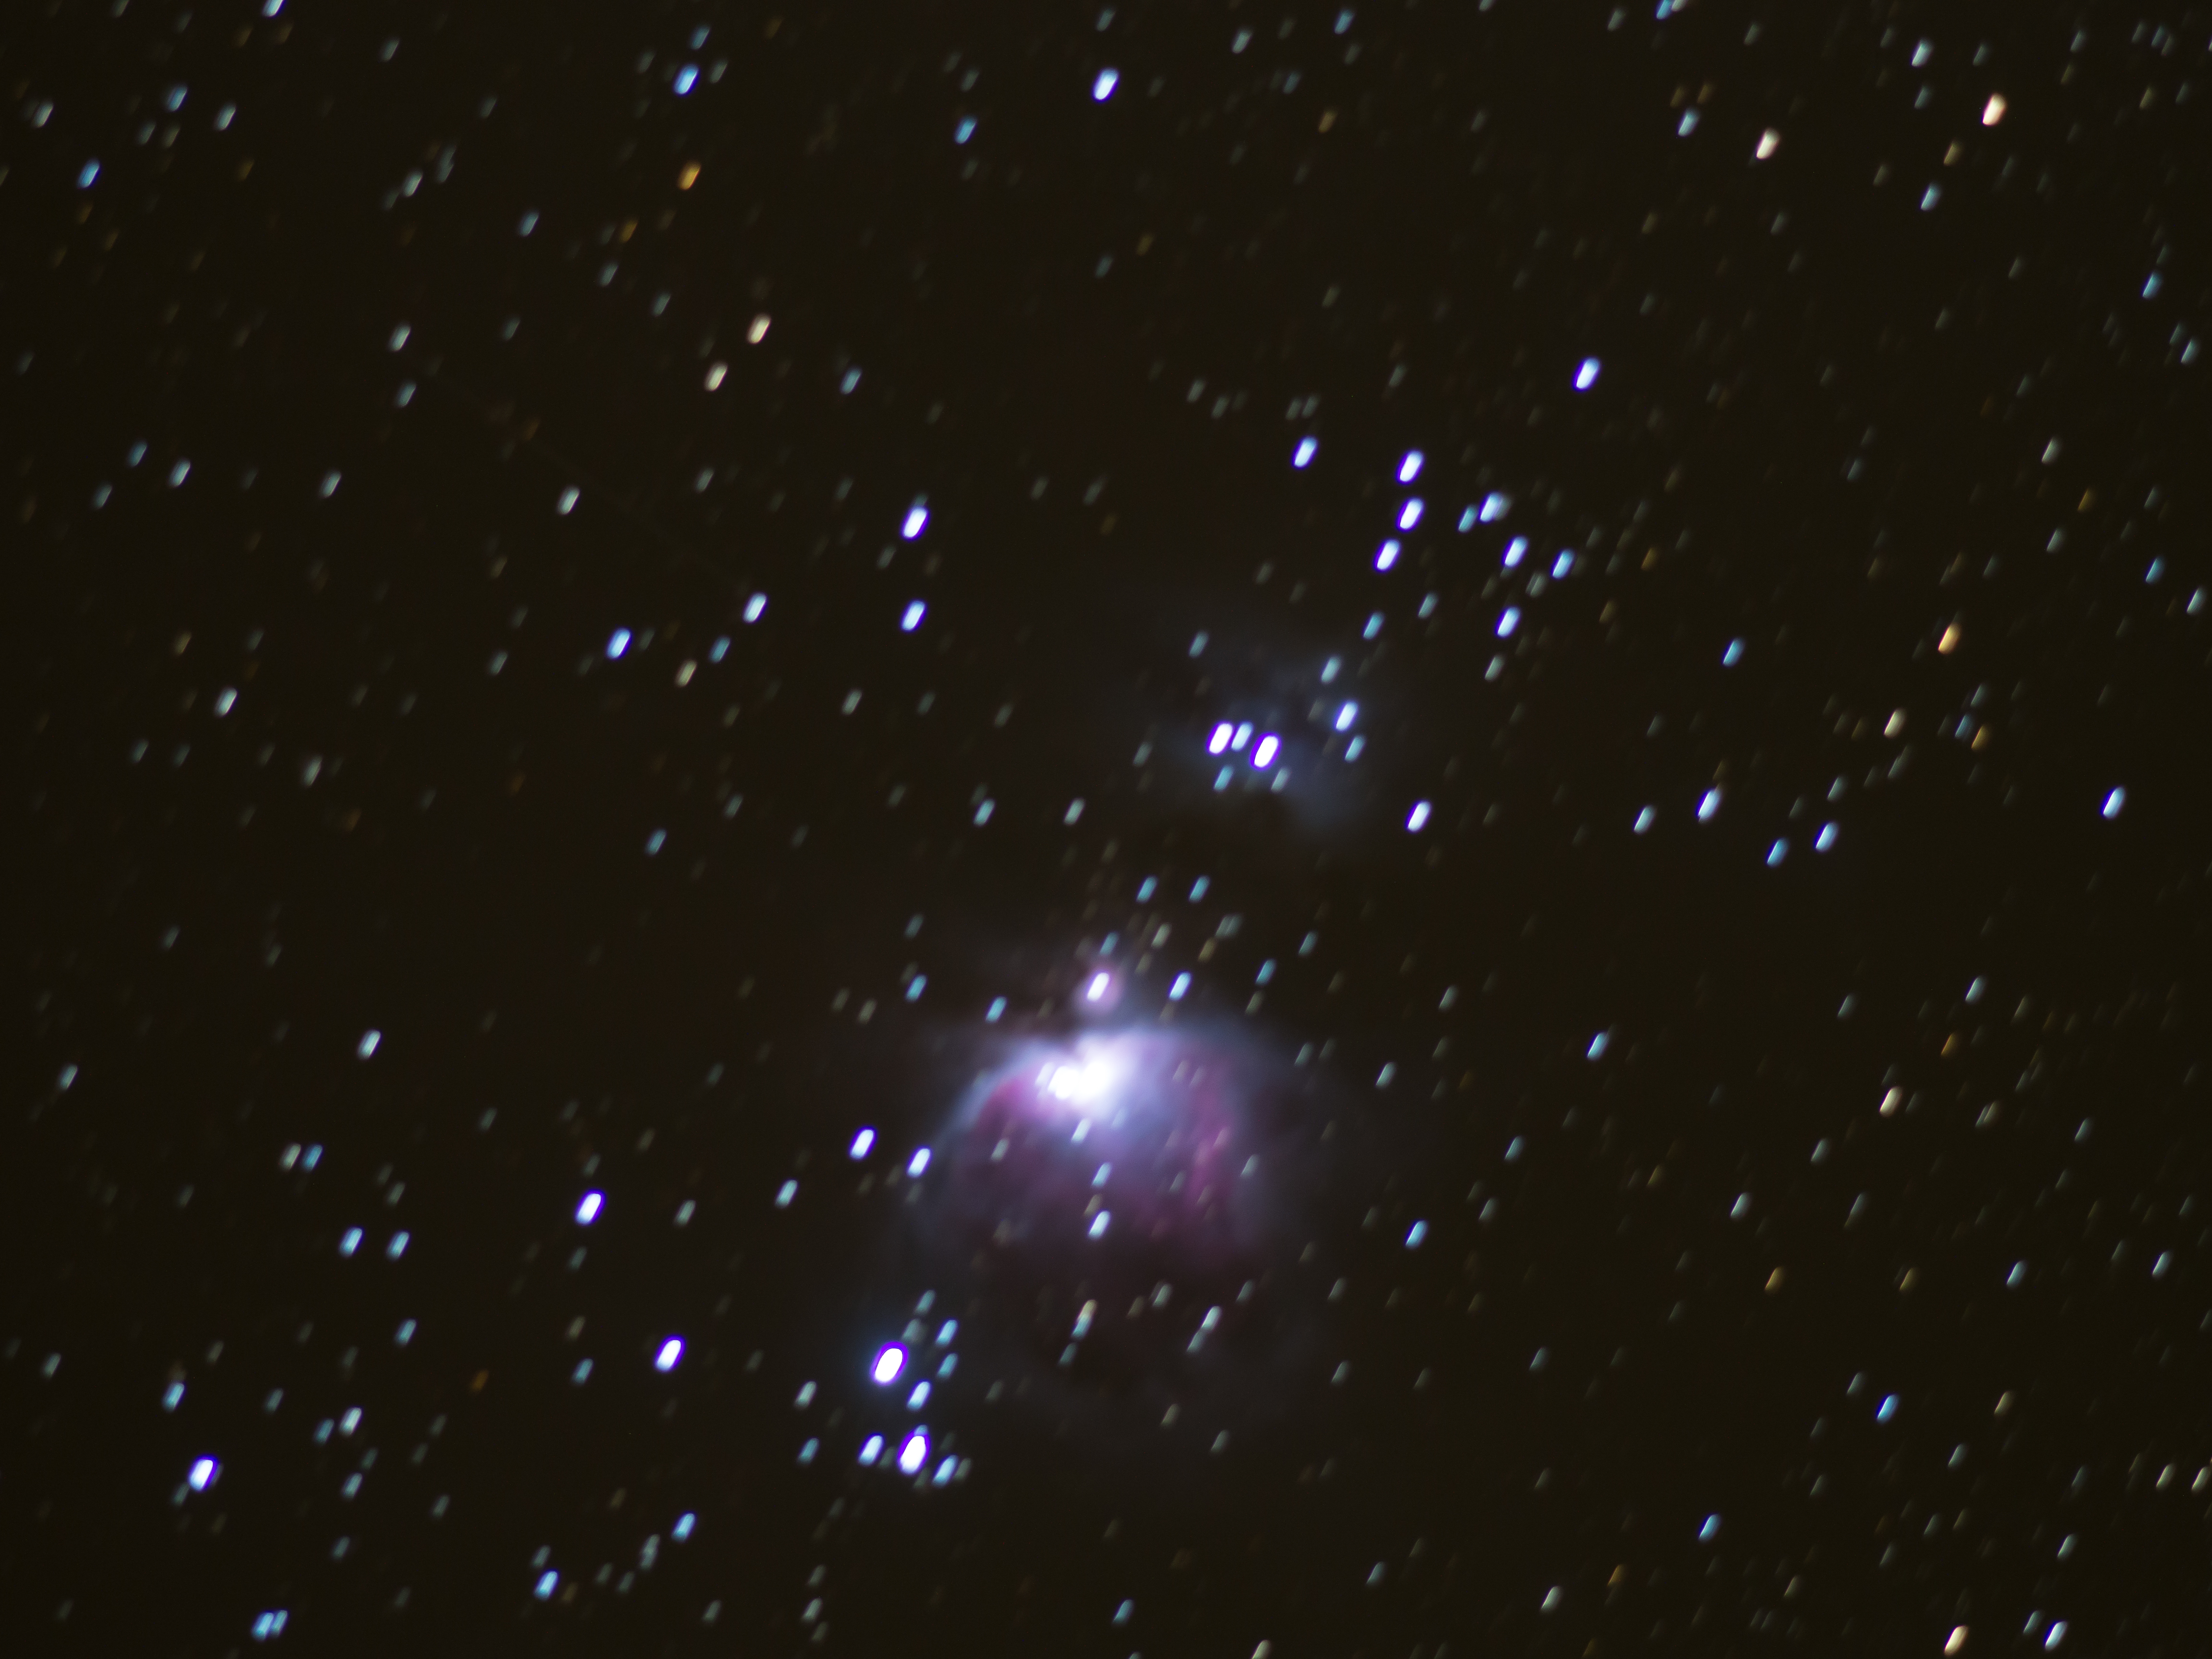
This is the Horsehead nebula, but not a very good image.
This was taken with a Canon 100mm f/2.8 lens at 2.8, 240 sec at
ISO 400 with Oly EM-5 camera. The purple rings are
chromatic aberrations in the lens.
This image was just so-so but it did capture a meteor that flew
by us while we were shooting Orion. It is the green streak
at the left of the photo above. The red streak at the
bottom was a reflection from tail lights of a near-by car.
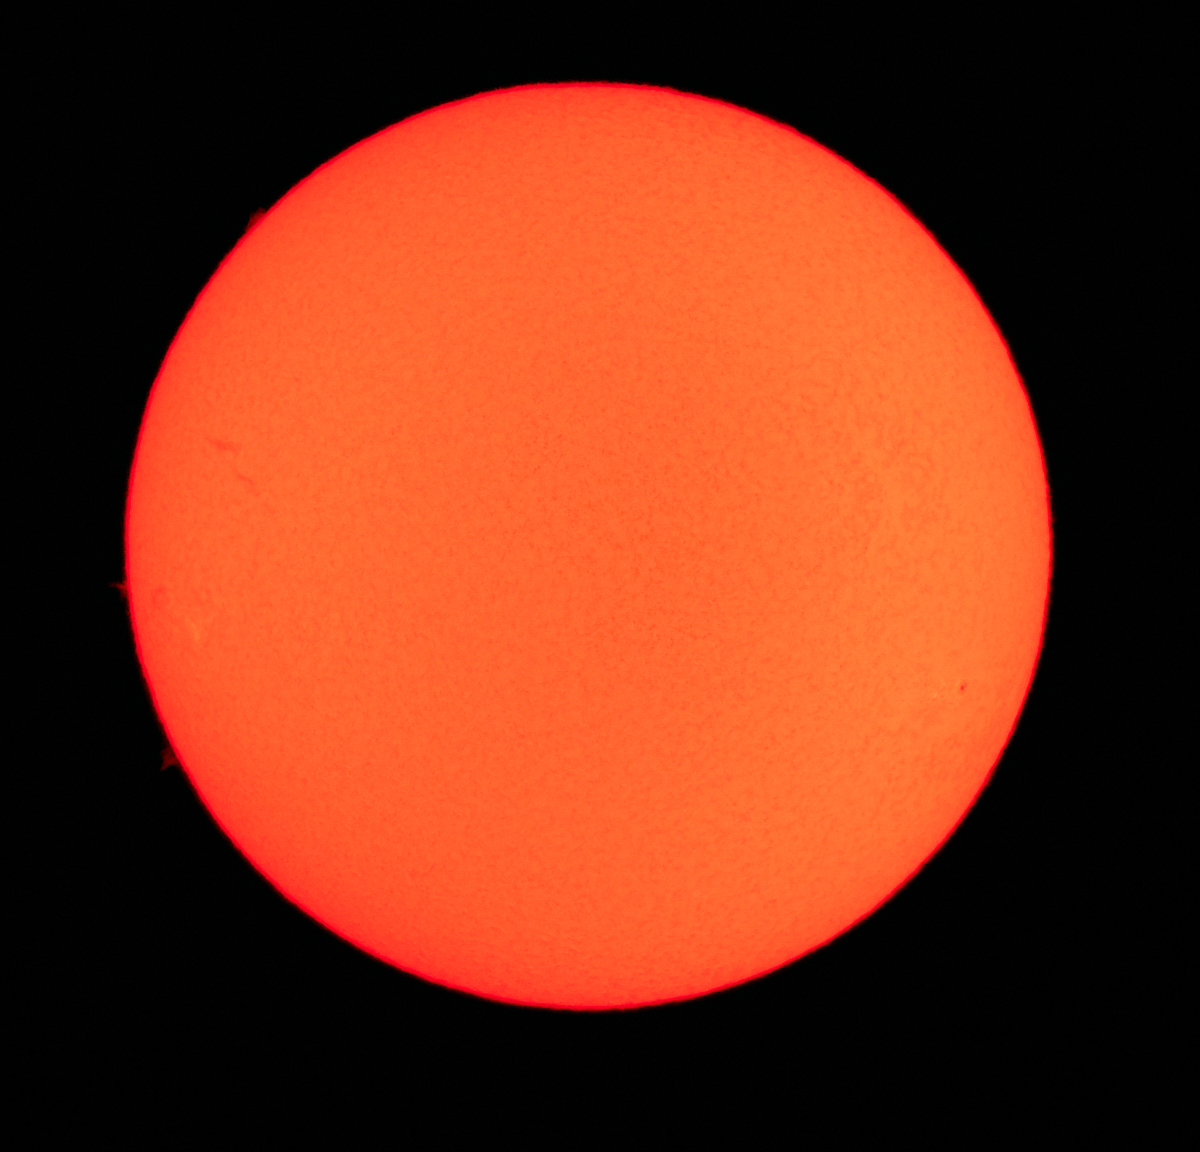
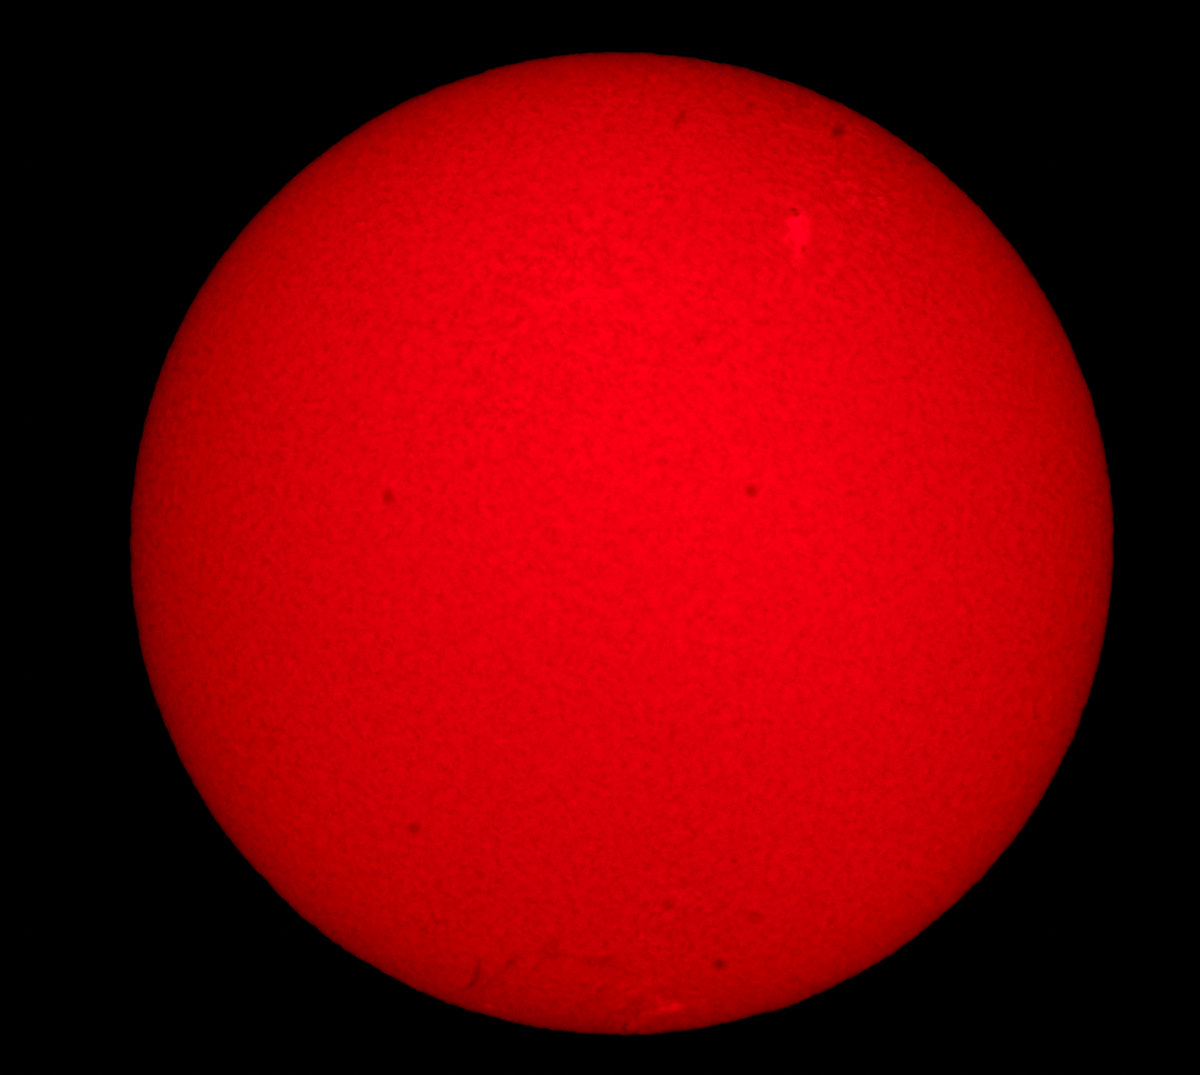
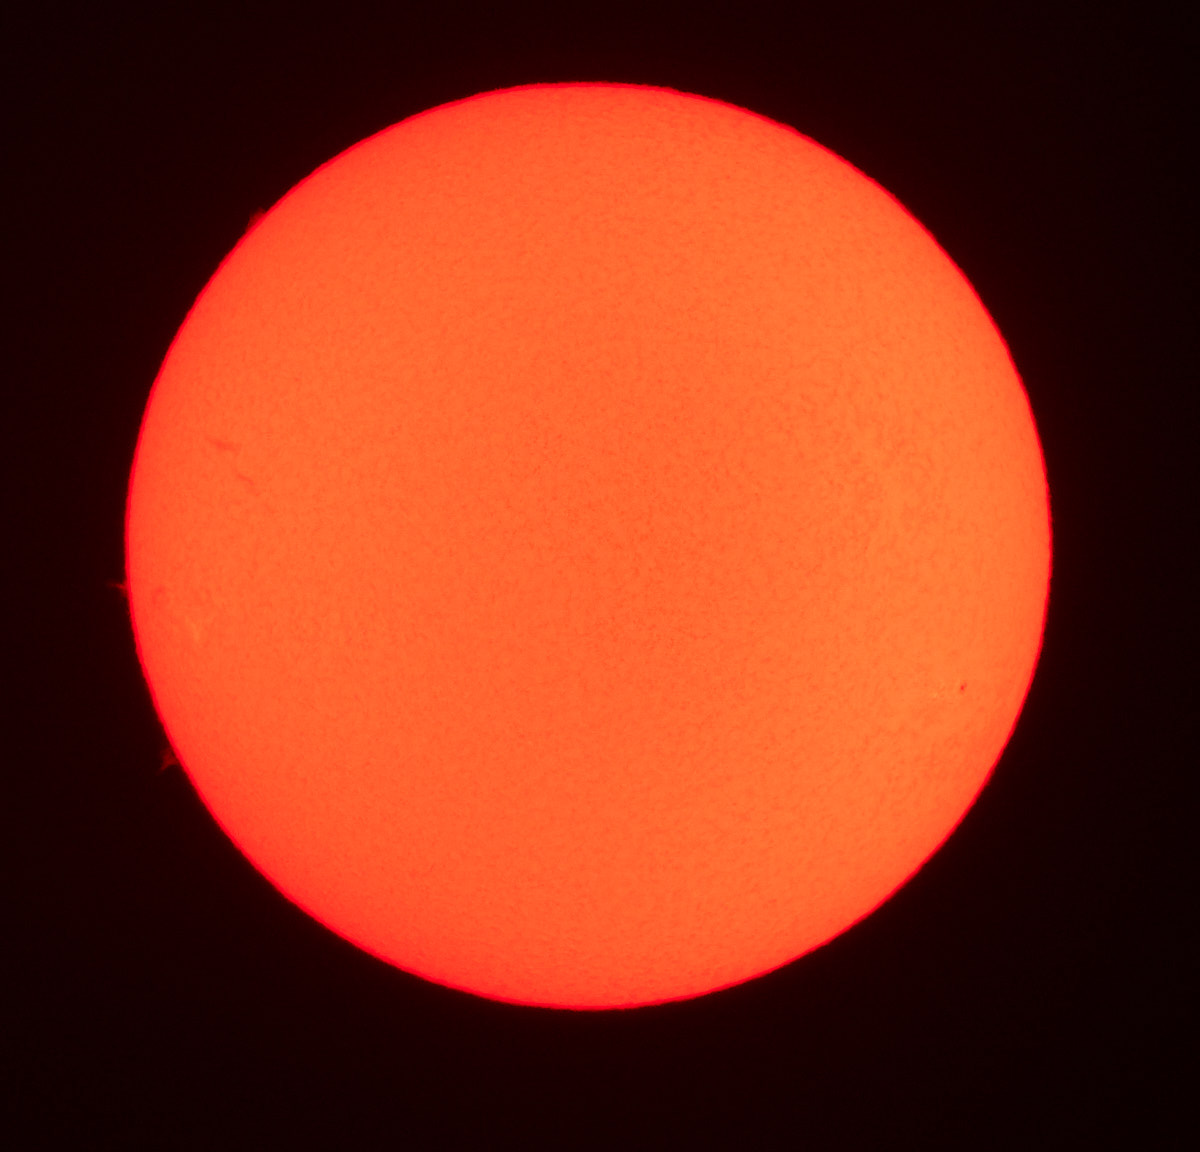
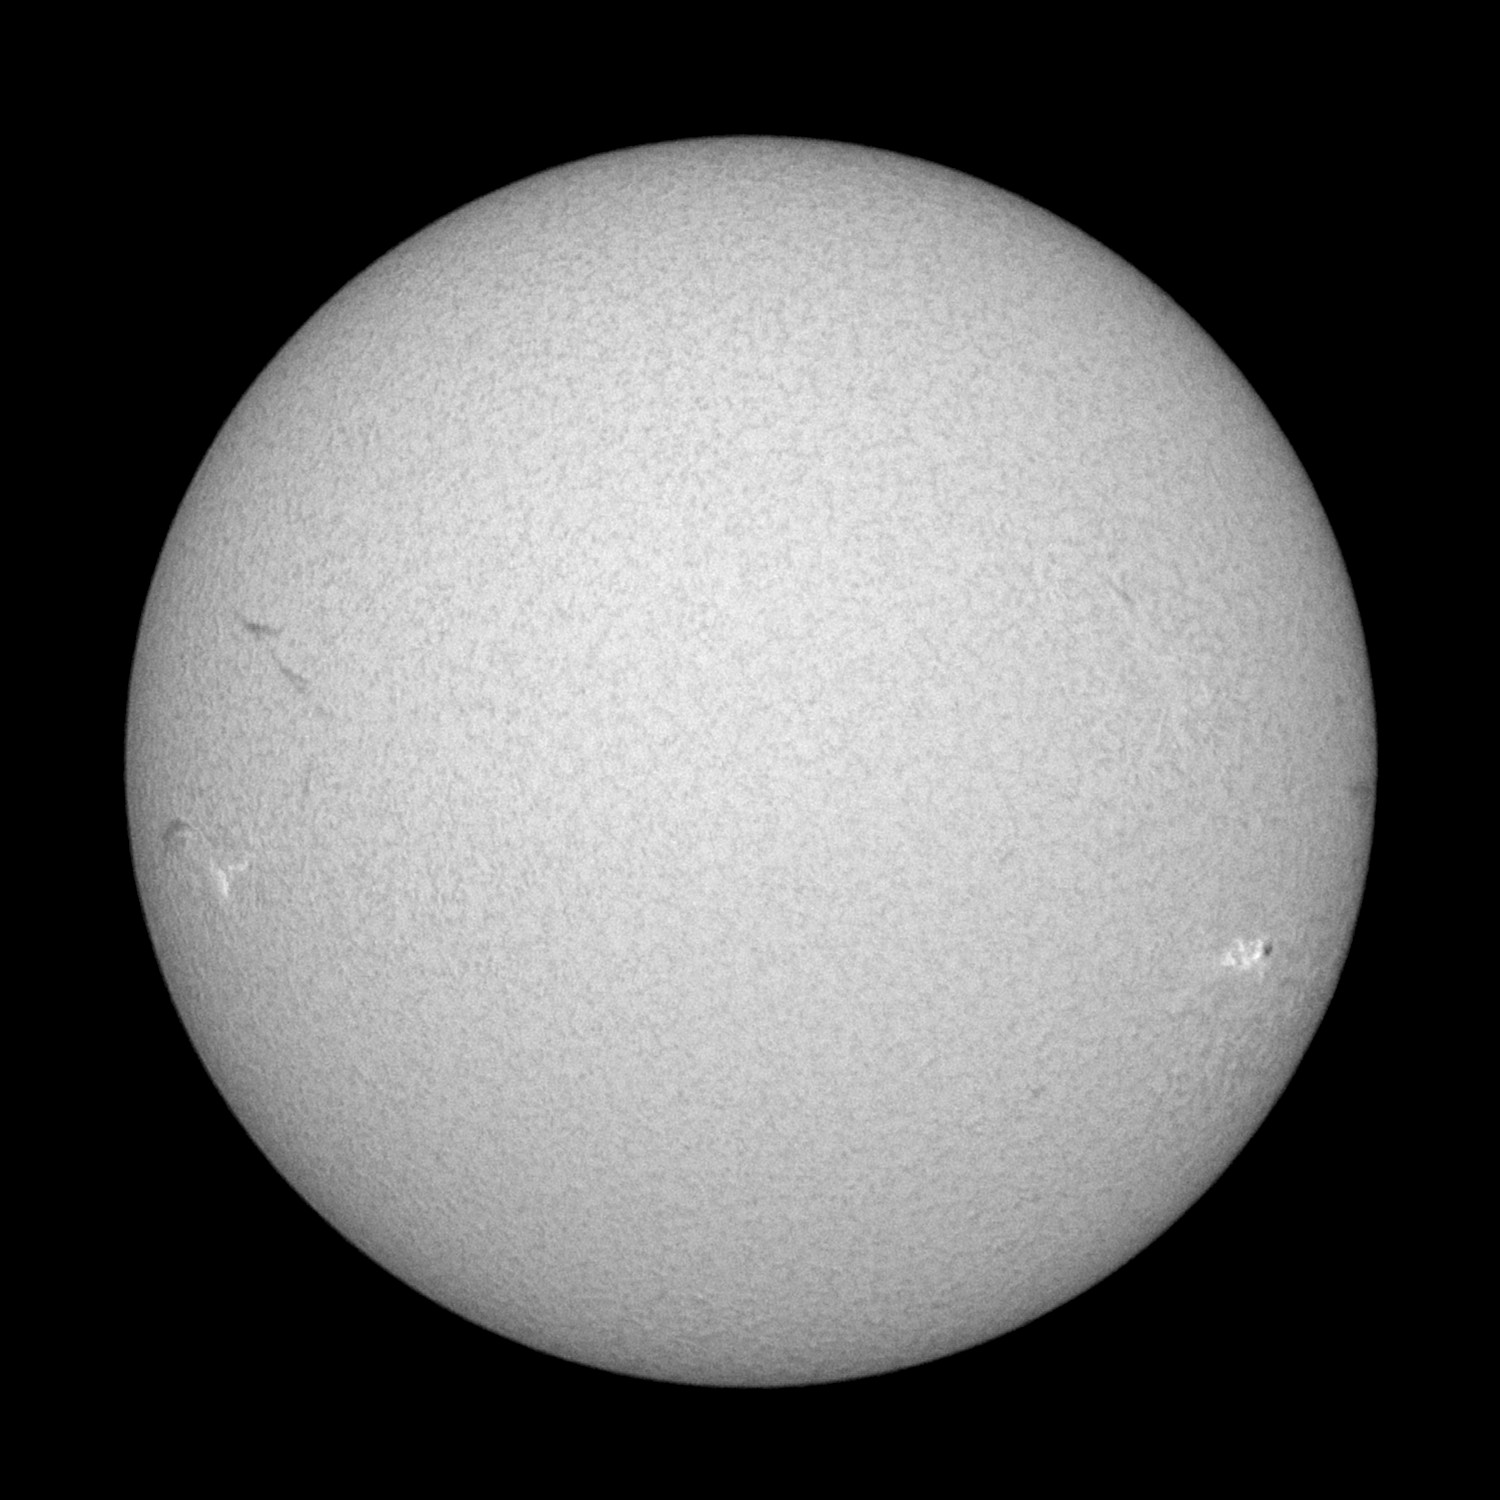
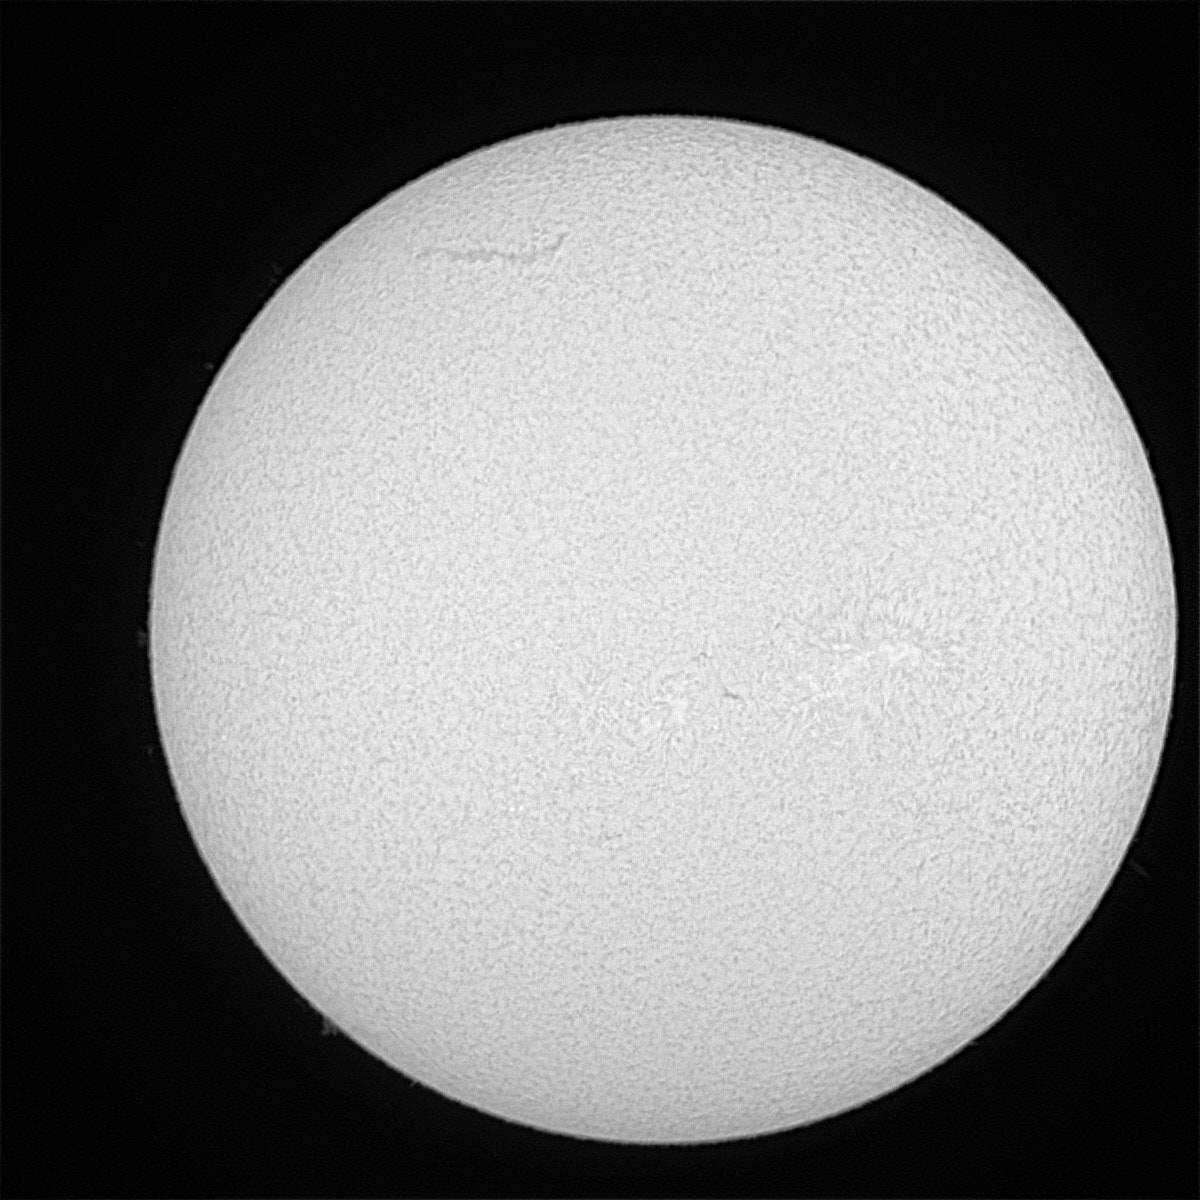
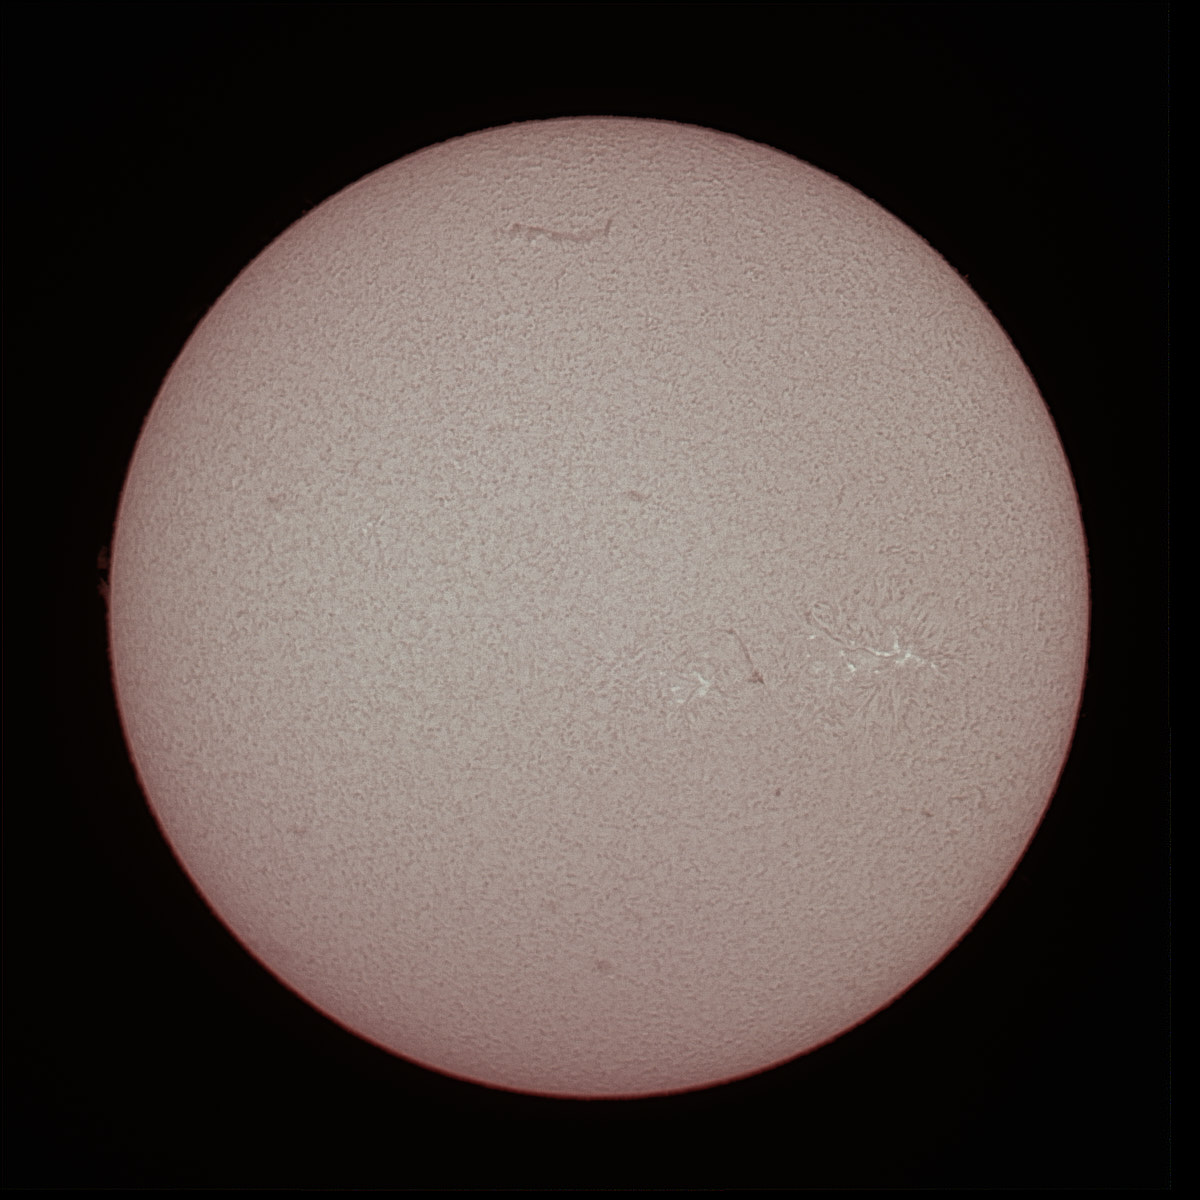
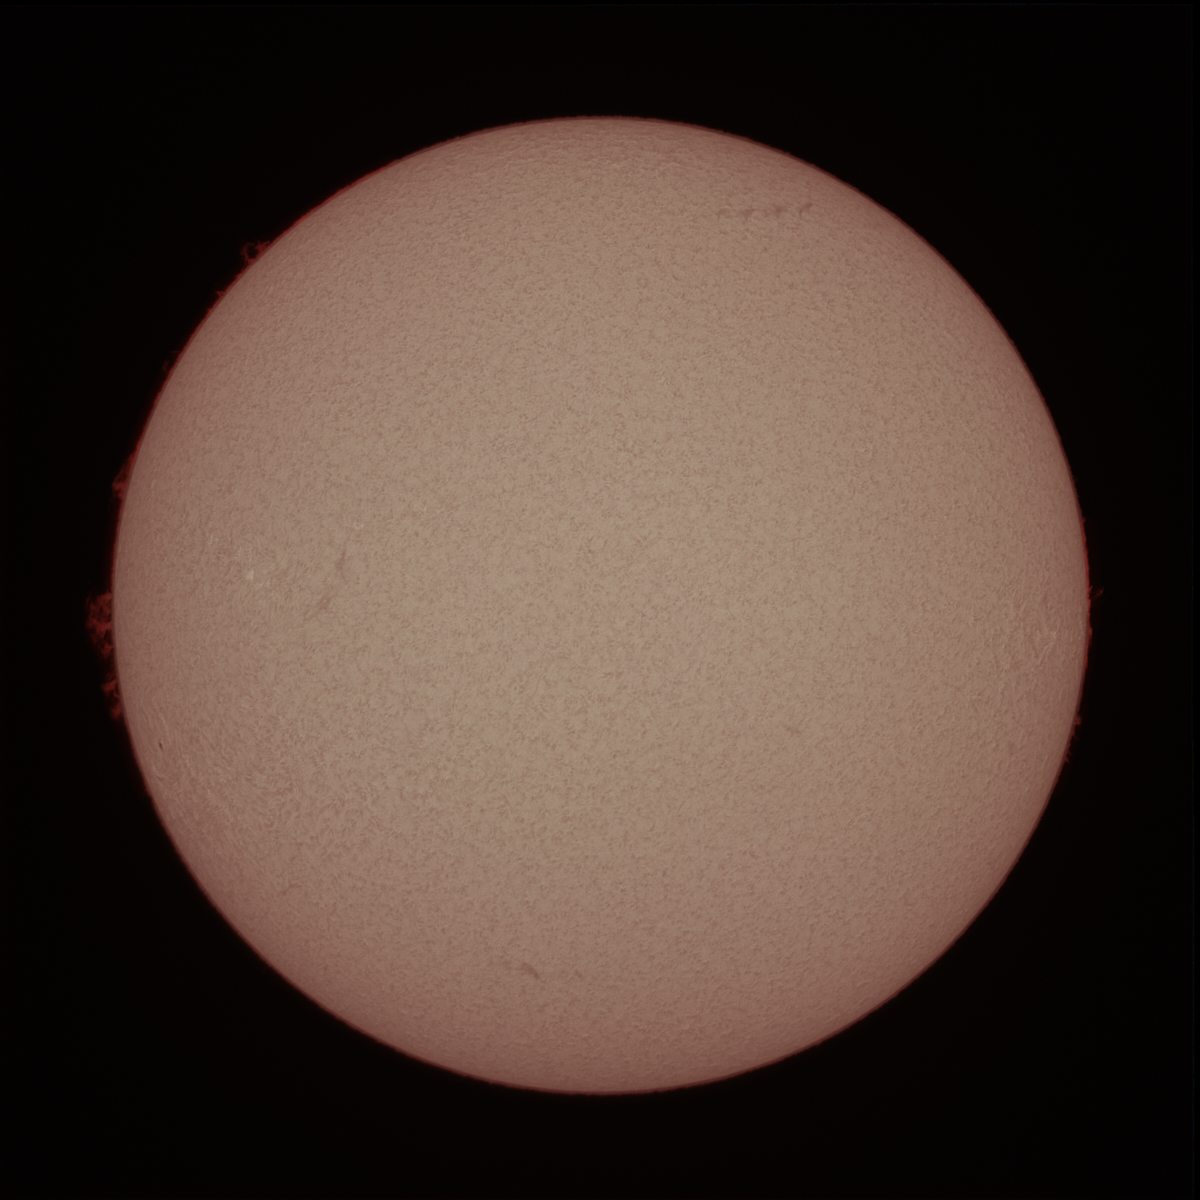
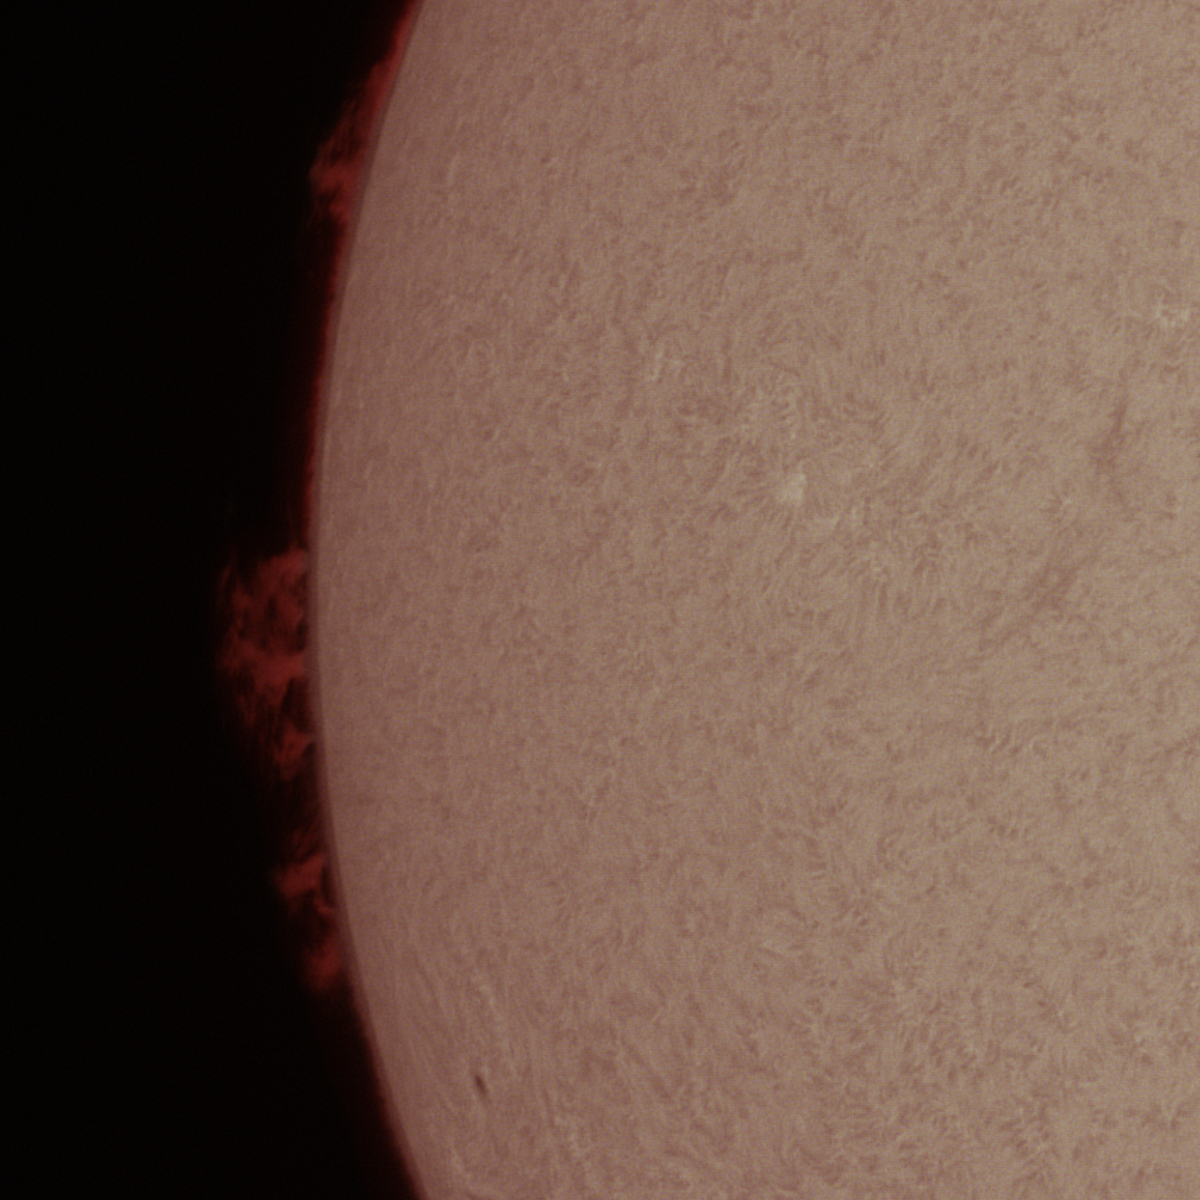
20170515 - Given the upcoming solar eclipse, I got the wild
idea to get a solar telescope. I got a Lunt Solar Systems LS60
scope. I first tried a Coronado, but was displease with the focus
acuity and a few other aspects of the scope, so I exchanged it for
the Lunt. The Lunt is a much better designed
and engineered scope. There was (is) a rather
steep learning curve on this setup and inititally
I had "plumbing problems" which were purely
mechanical - things like adapters for camera mount,
correct adapter lengths, etc. But,
with some resolve and a credit card I was
able to get the adapters that will work
with the newer mirrorless cameras. Standard
DSLR hardware will not allow
the camera to focus as it is
behind the critical focus point of
the scope.
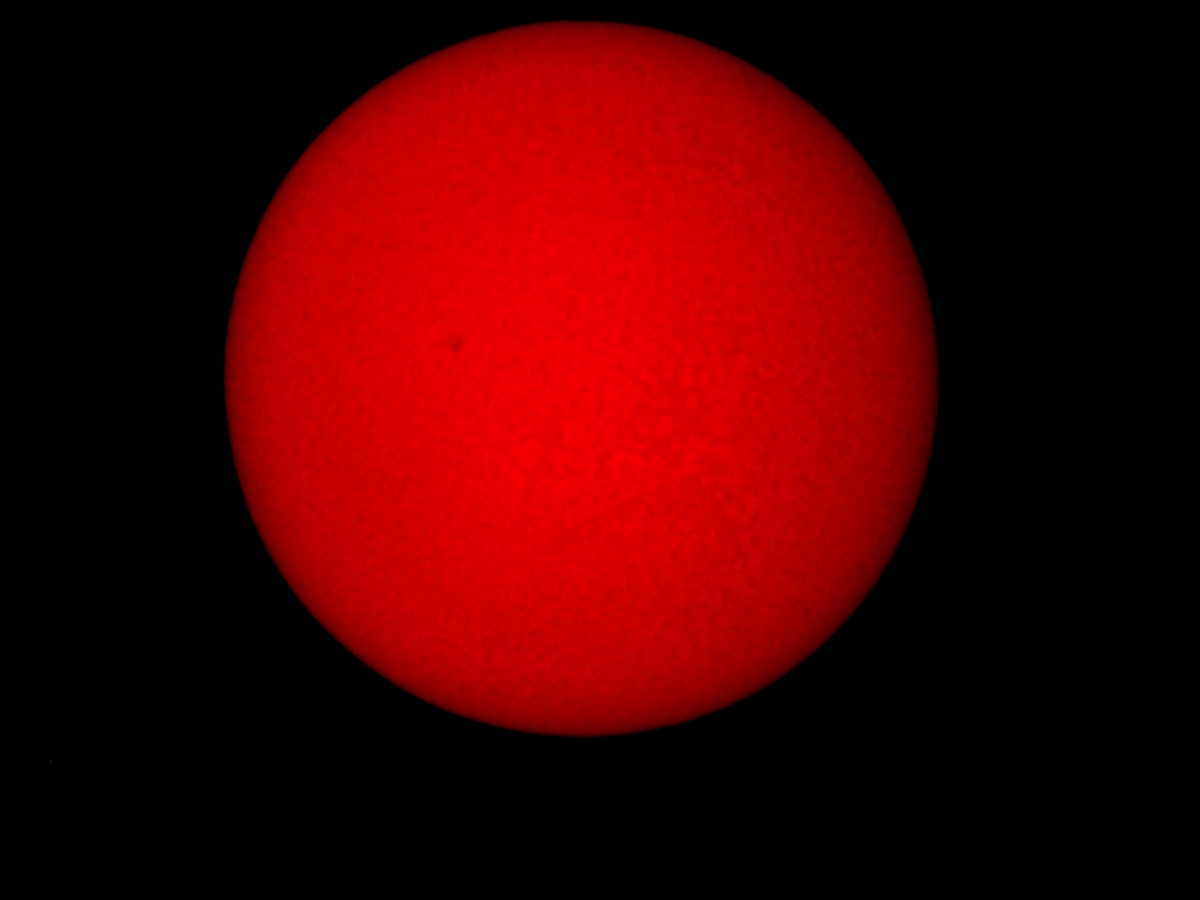
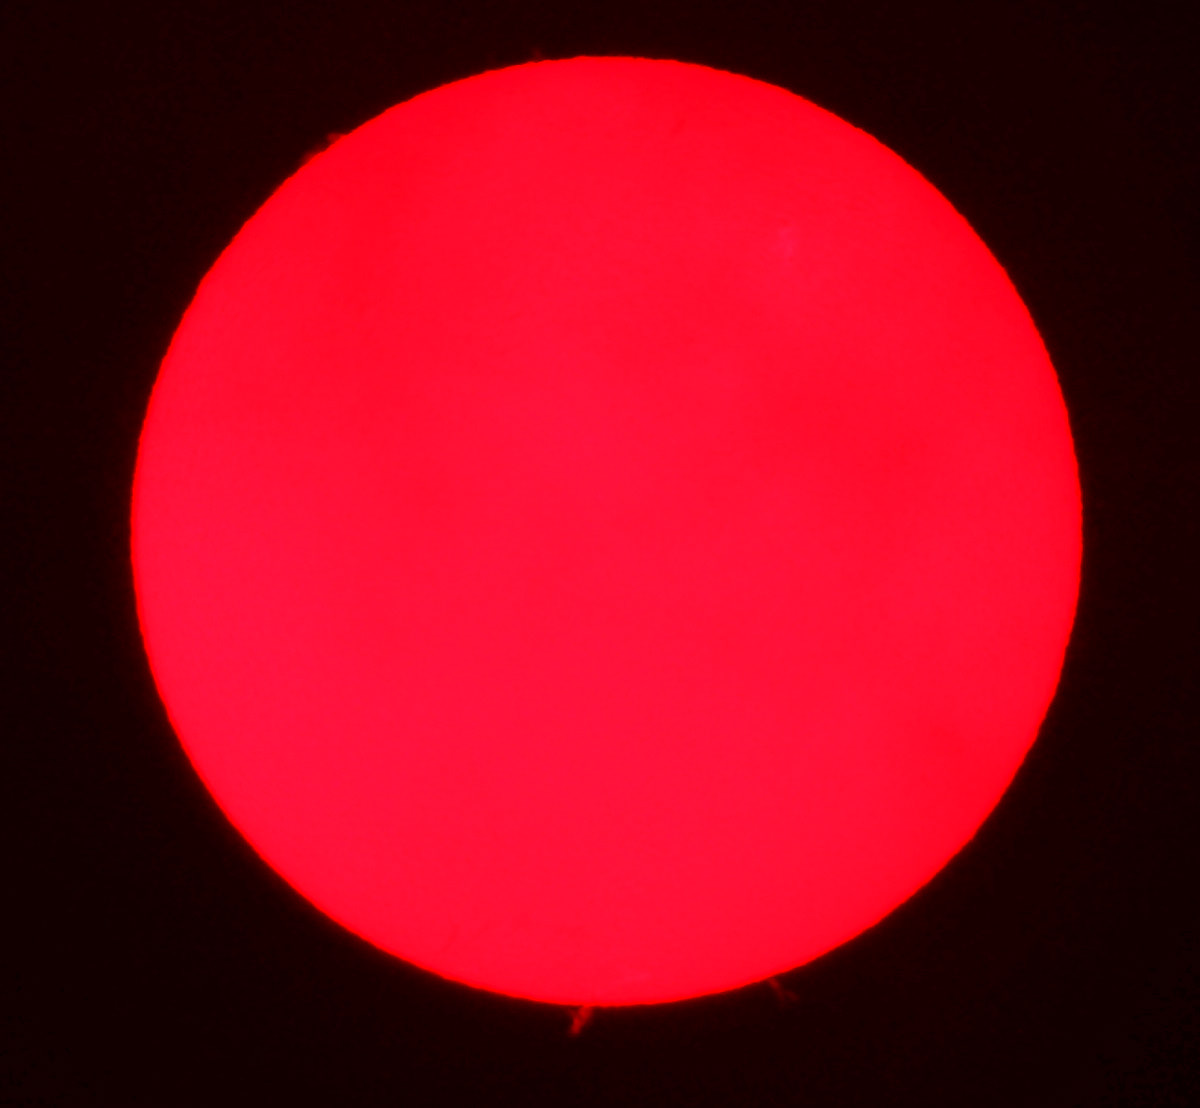
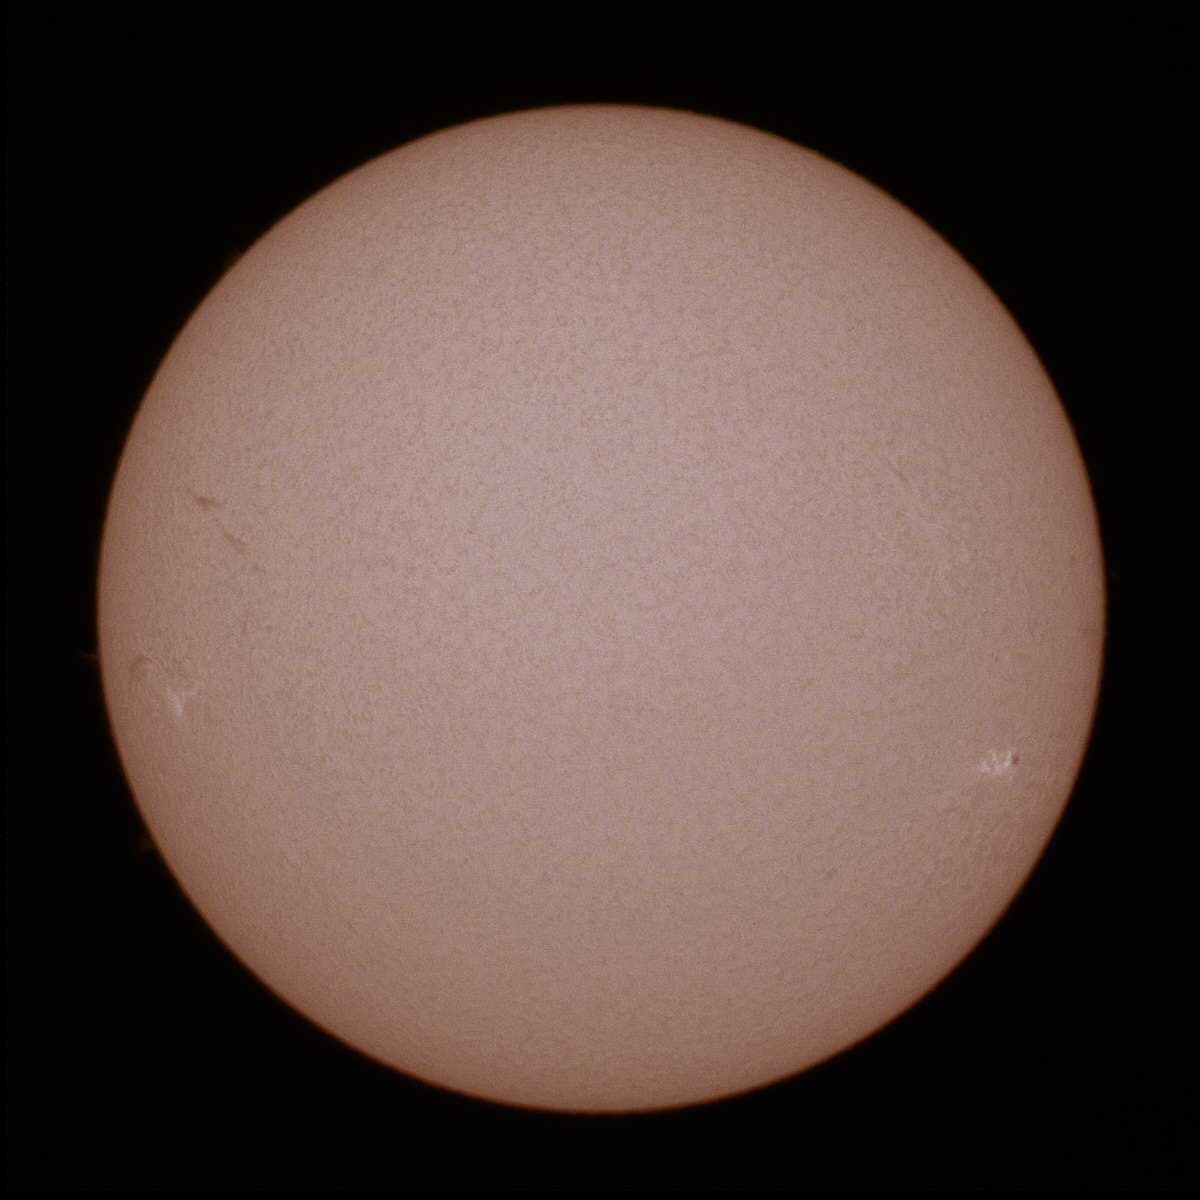
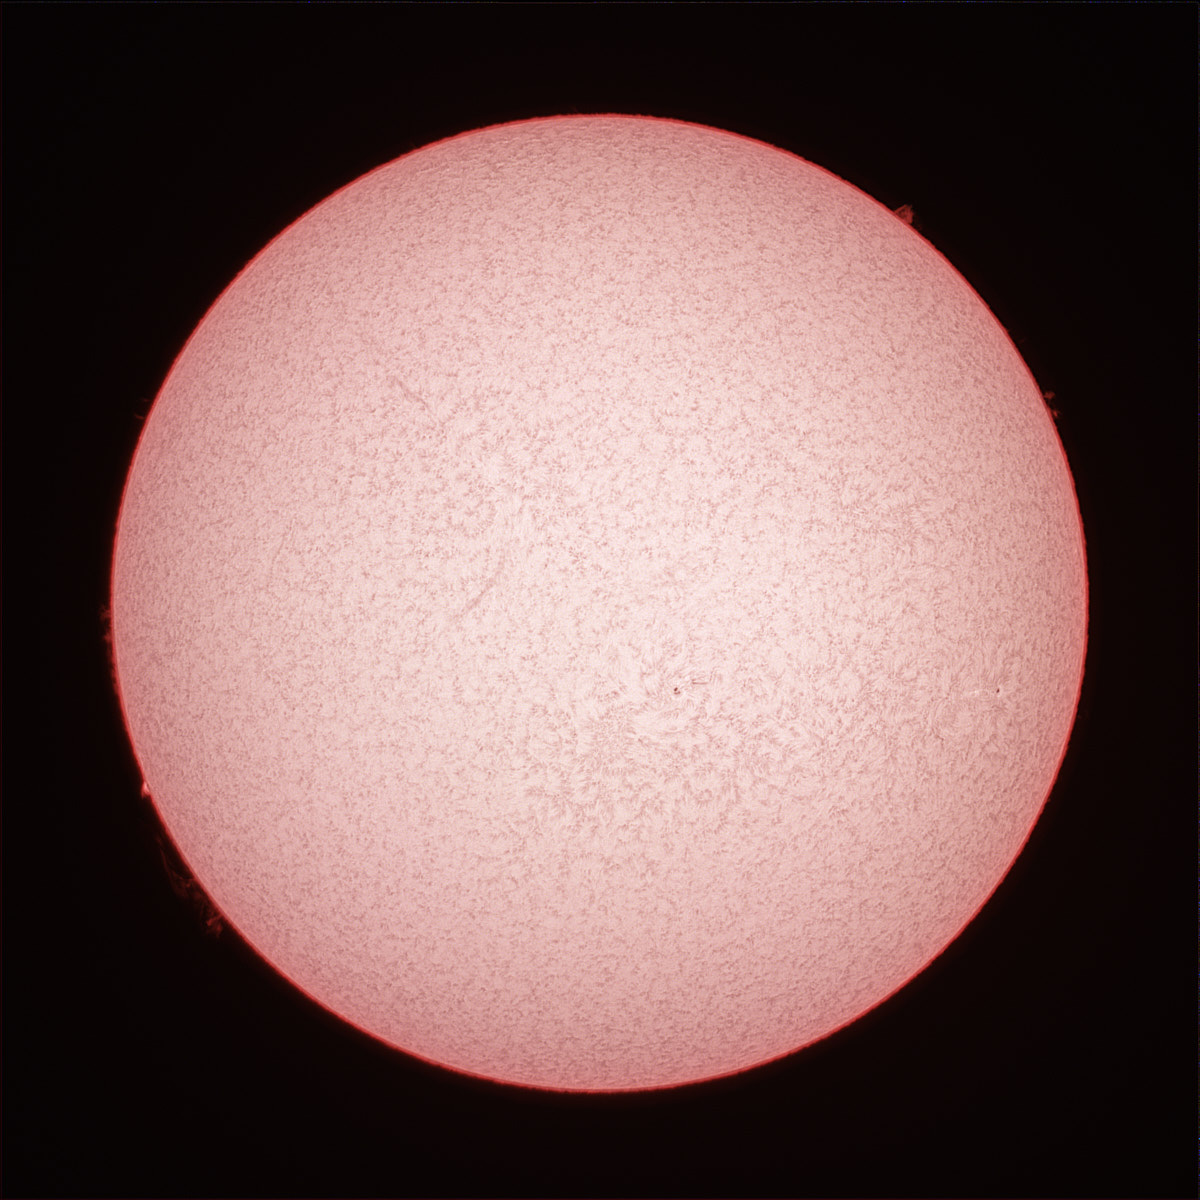
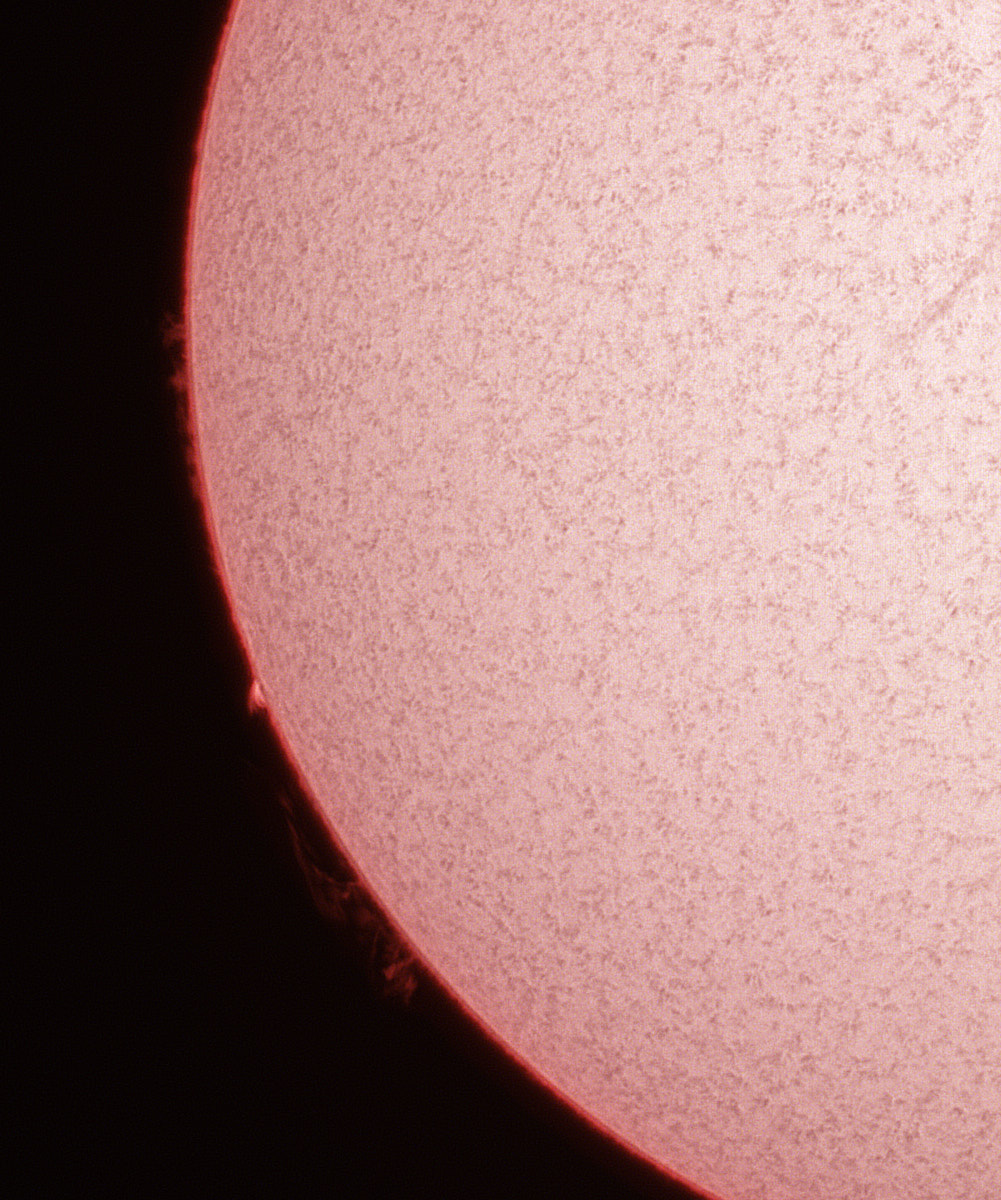
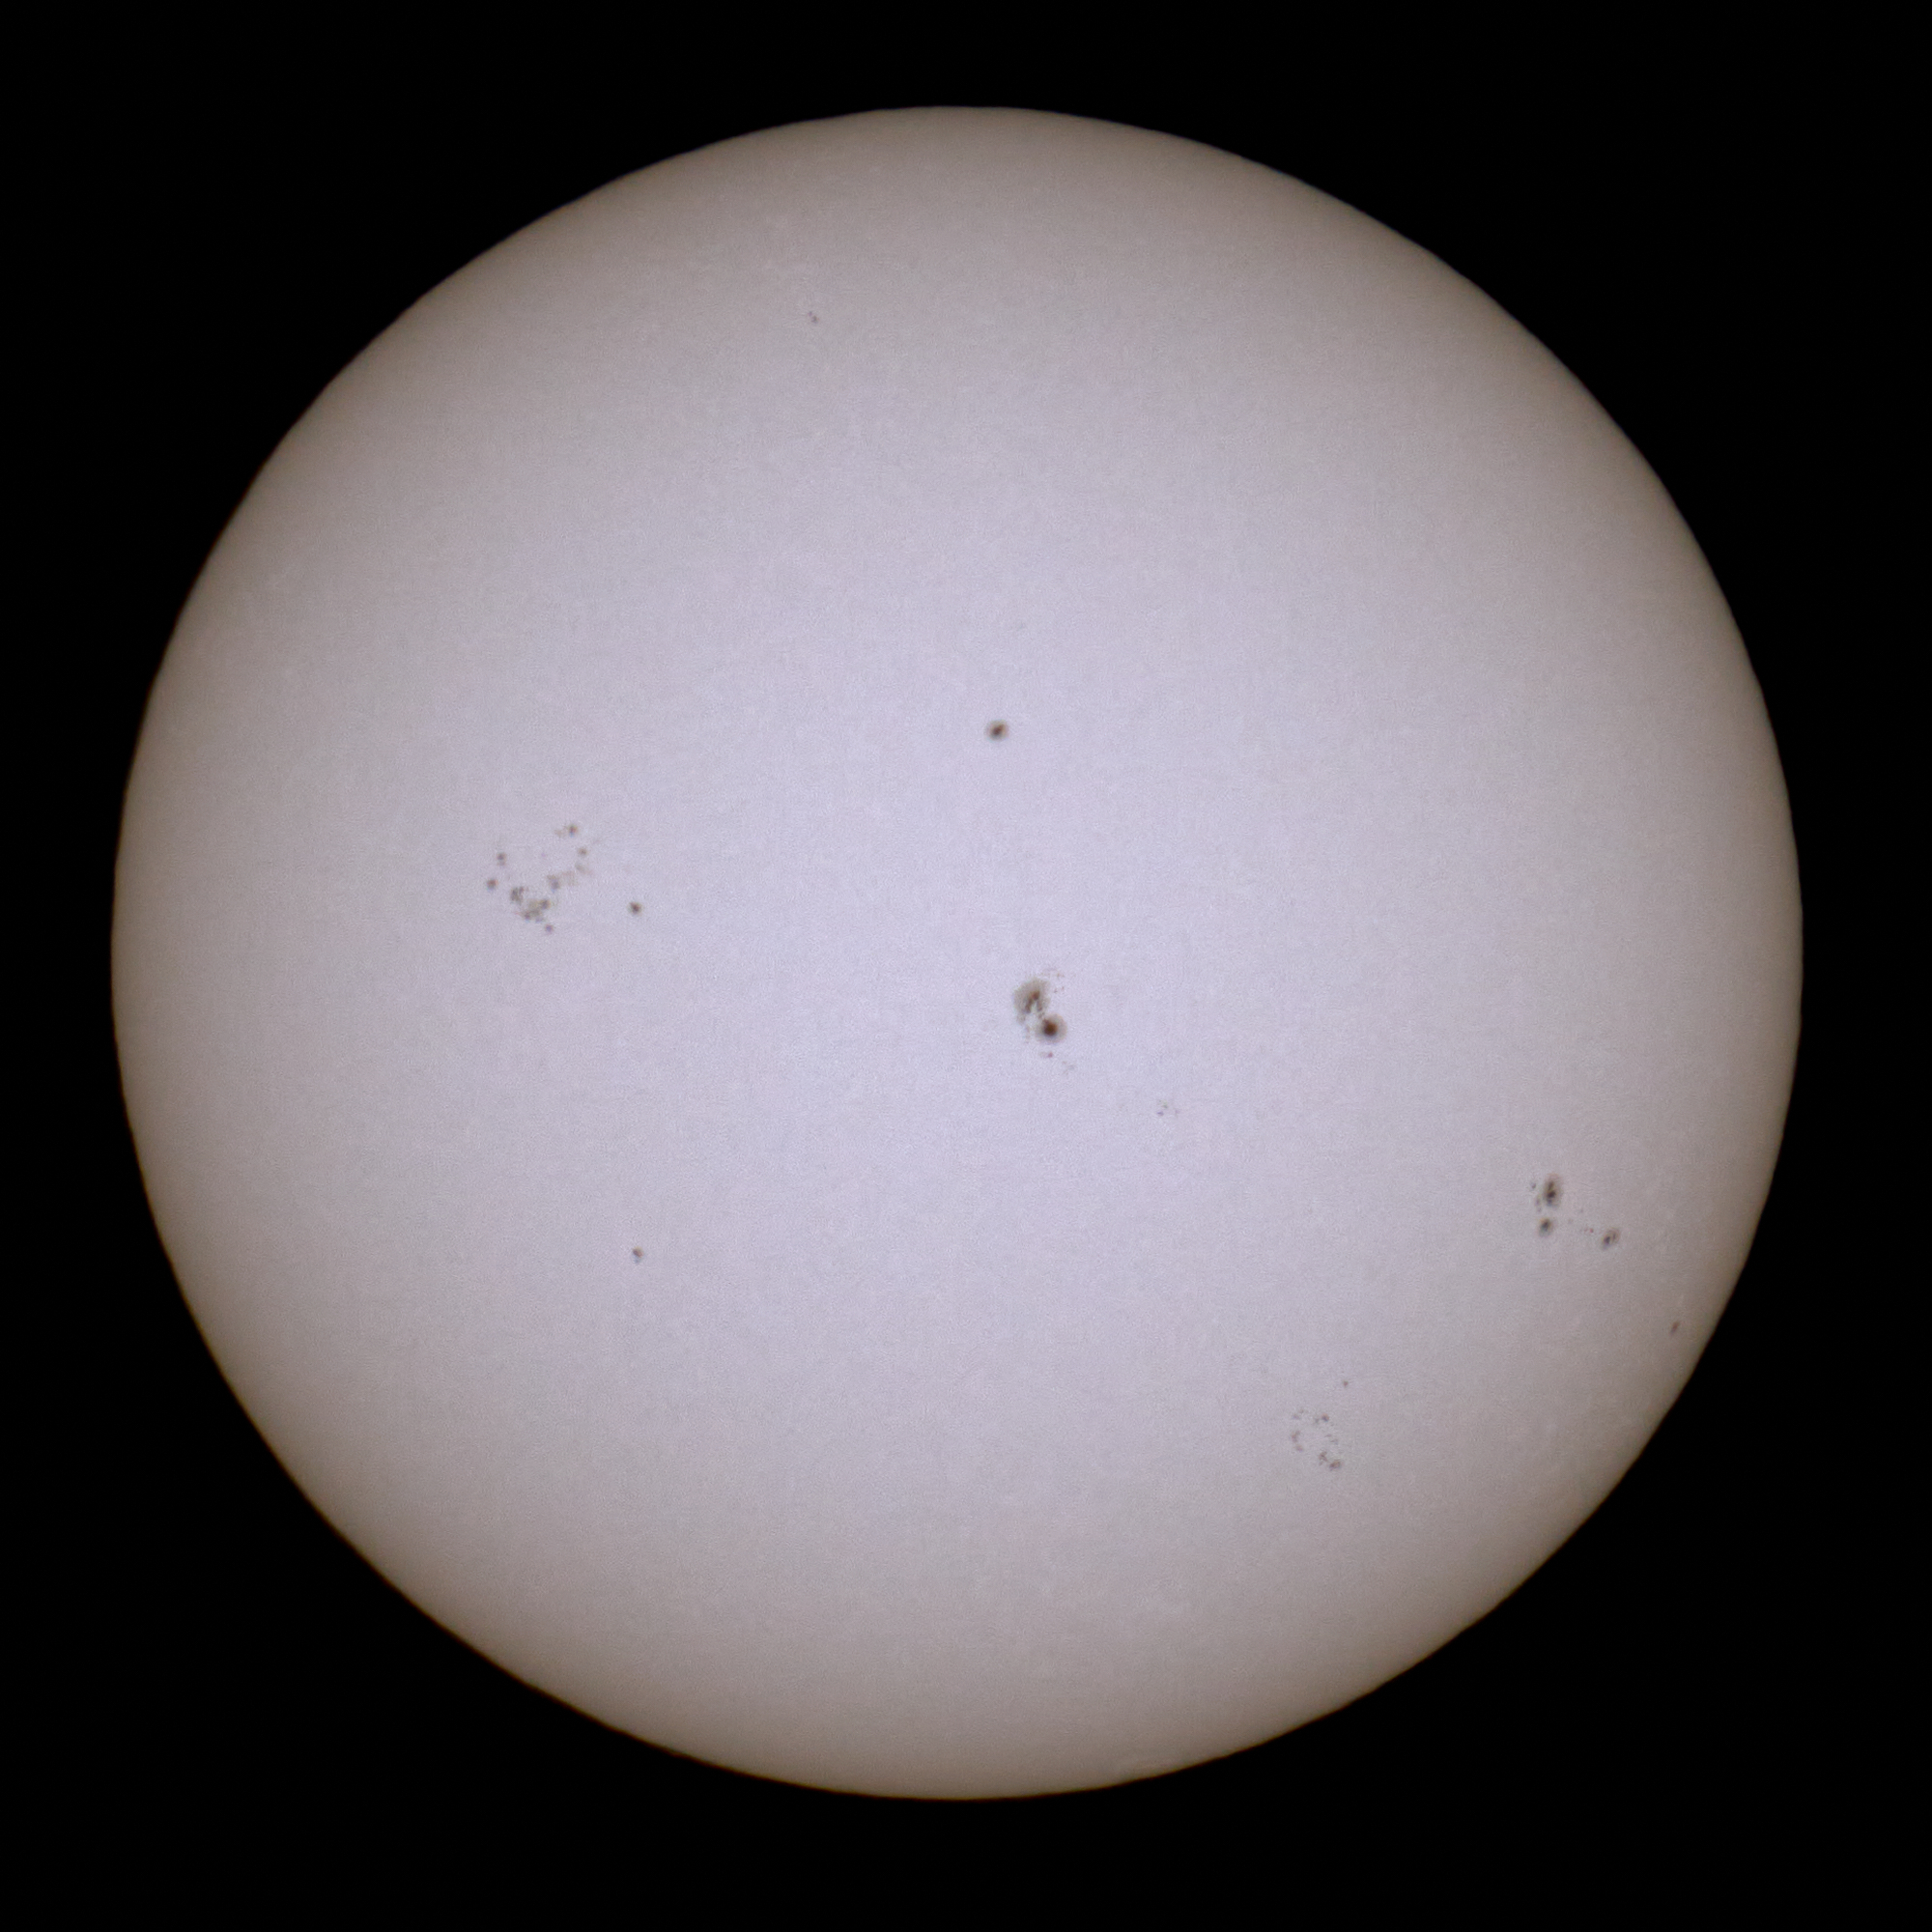
Sun using NiSi neutral density
solar filter. Sony A-1 with 100-400mm lens with 2X doubler
(800mm) (handheld). ISO 200, 1/4000 at f/11. Level
adjustment with Capture One. Reduced sized image shown here;
click on image to show full size.
Hope
that you enjoyed these shots. I will add more images to this
list as they are taken. Click
here for 2017 Solar Eclipse photos.